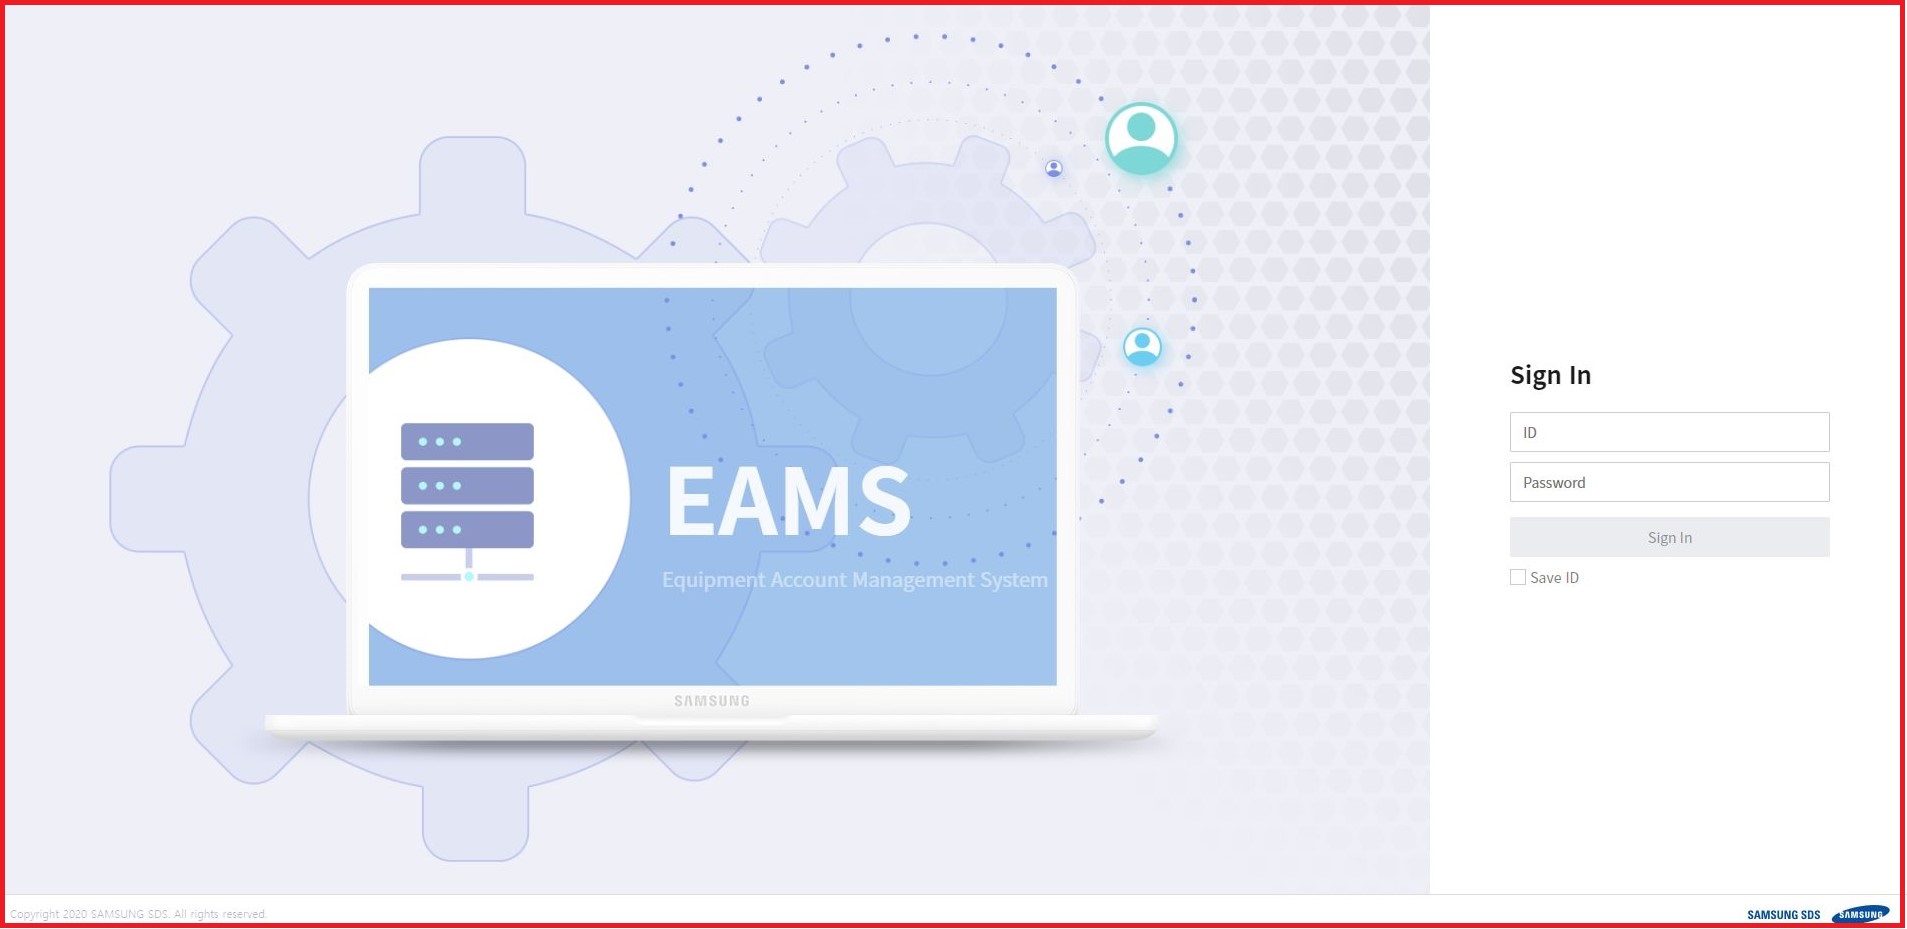
1. Getting Started
EAMS(Equipment Account Management System) is a web-based terminal tool to remote access to hosts.
It supports accessing to all of SSH or RDP hosts in your VPC through the web browser.
This is a quick start guide. We will guide you from installing EAMS to connecting to your instances.
To do that, you need to have hosts to connect to.
prerequisites :
1) Network connection between EAMS and the SSH/RDP hosts.
2) Using the password authentication method for connecting to the hosts.
There is a license limit in the free version. EAMS does not have its own backup function. If you want a backup, use AWS services.
1.1. Install EAMS
When you create an instance for EAMS, the EAMS service is set to start automatically.
Just you launch the EAMS product, you can access the application via web browser at https://<public_dns>:8443
However EAMS instance need to be granted privileges to discovery your instances.
To grant privileges to EAMS instance, follow the instructions below.
1.1.1. Create instance profile
-
Go to https://console.aws.amazon.com/iam/home#/policies$new?step=edit
-
Switch to the JSON tab and paste the following policy. This policy grants the instance access to CloudWatch Logs to push the connection history and the ability to assume an IAM role in any account where you are running instances.
AWS Policy (eamsaws) :
{
    "Version": "2012-10-17",
    "Statement": [
        {
            "Sid": "VisualEditor0",
            "Effect": "Allow",
            "Action": [
                "ec2:DeleteTags",
                "ec2:CreateTags"
            ],
            "Resource": "arn:aws:ec2:*:*:instance/*"
        },
        {
            "Sid": "VisualEditor1",
            "Effect": "Allow",
            "Action": [
                "ssm:SendCommand",
                "ssm:DescribeInstanceInformation",
                "logs:CreateLogGroup",
                "ssm:GetCommandInvocation"
            ],
            "Resource": "*"
        }
    ]
}
-
Click on Review Policy, provide a name such as eamsaws and click on Create Policy
-
Choose EC2 under services that will use this role
-
Search the following and click Next
-
AmazonEC2ReadOnlyAccess
-
AWSCloudTrailFullAccess
-
CloudWatchEventsFullAccess
-
AmazonS3FullAccess
-
AmazonSNSFullAccess
-
eamsaws (which you create in the previous step)
-
-
Provide a role name such as "EAMSAWS" and click on Create Role
-
Go to EC2 Service menu
-
Select the instance which EAMS is installed and Click on Actions → Instance Settings → Attatch/Replace IAM Role
-
Choose EAMSAWS in IAM role list. and Apply
Now you are ready to use EAMS.
1.2. Starting EAMS
In this step, We will try to access the instance from the first login.
1.2.2. First login
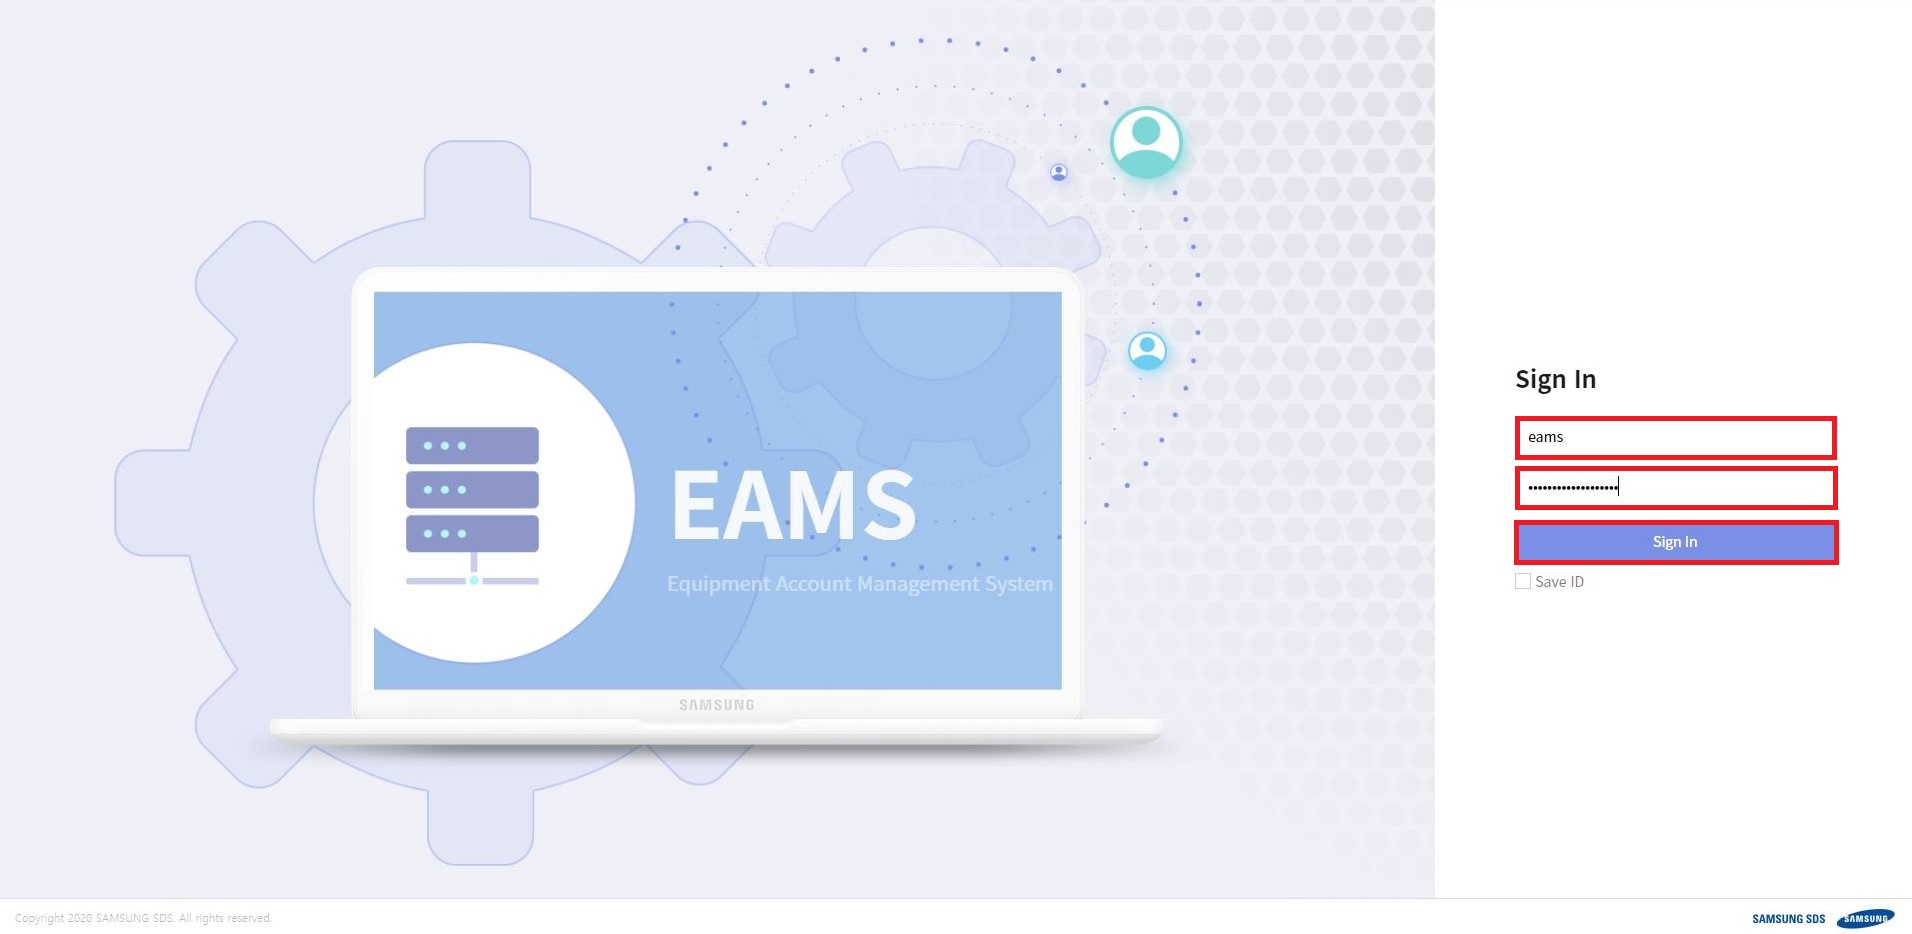
On the EAMS web, log in with ID(user defined) and instance ID as a password.
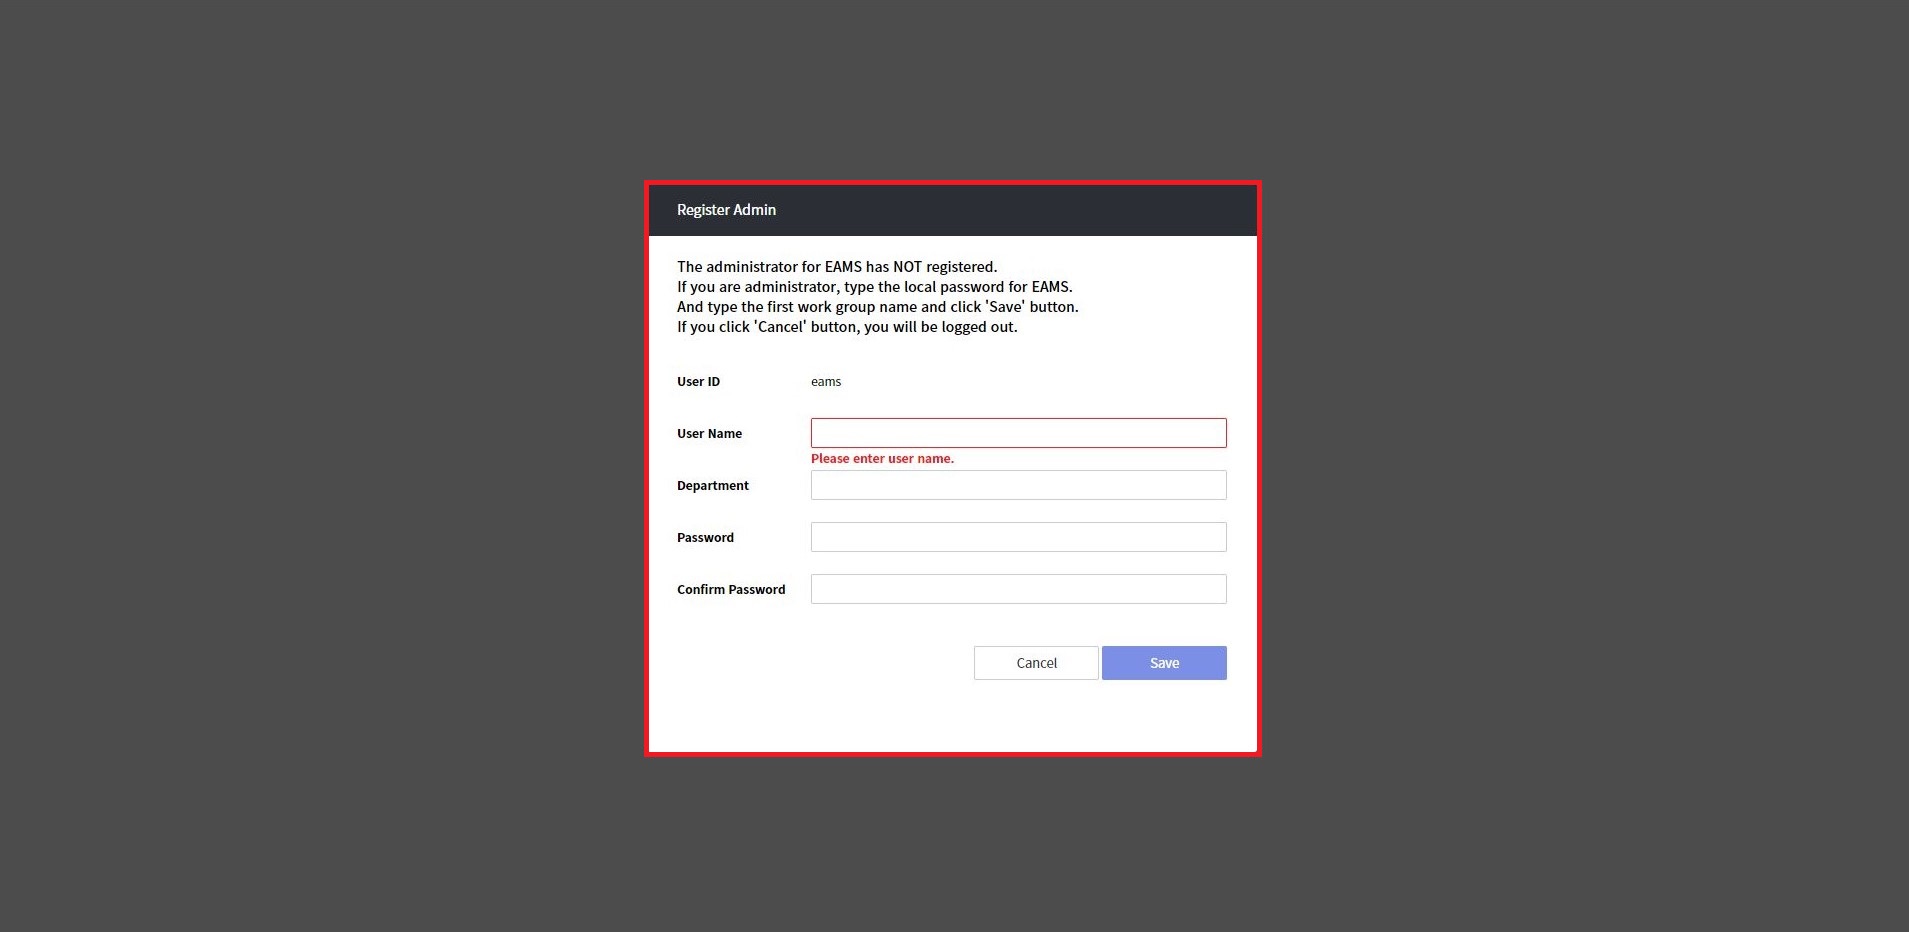
Then, you can see the popup window for Register Admin.
Enter user name, Department, Password, confirm password and save.
After register admin, return to Login page. Login again.
1.2.3. Connect hosts
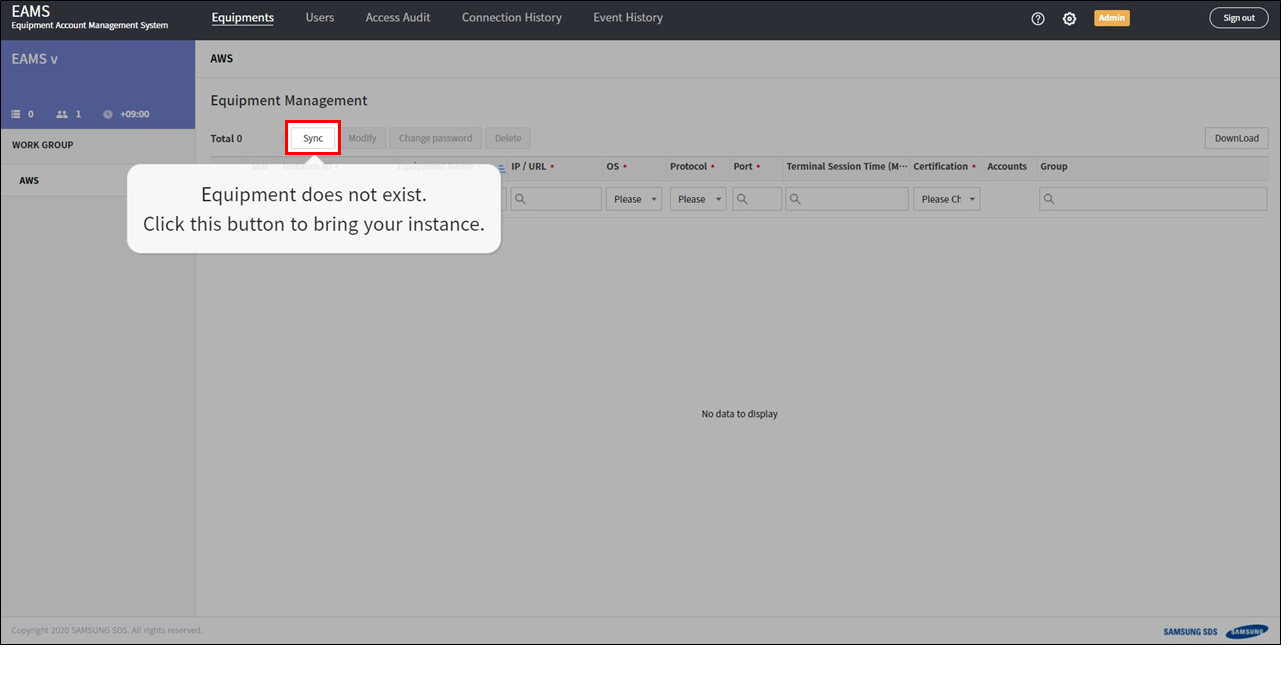
After login, you go to the Equipment Tab screen.
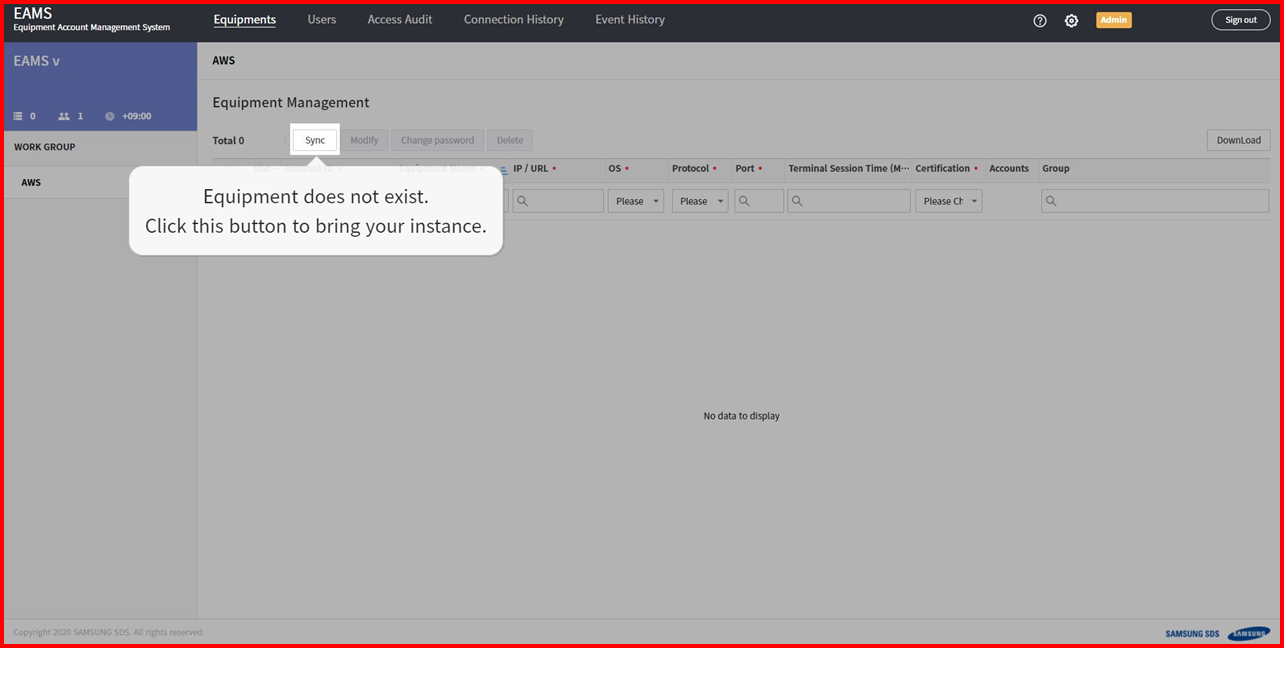
Click the sync button, EAMS will discovery your instances.
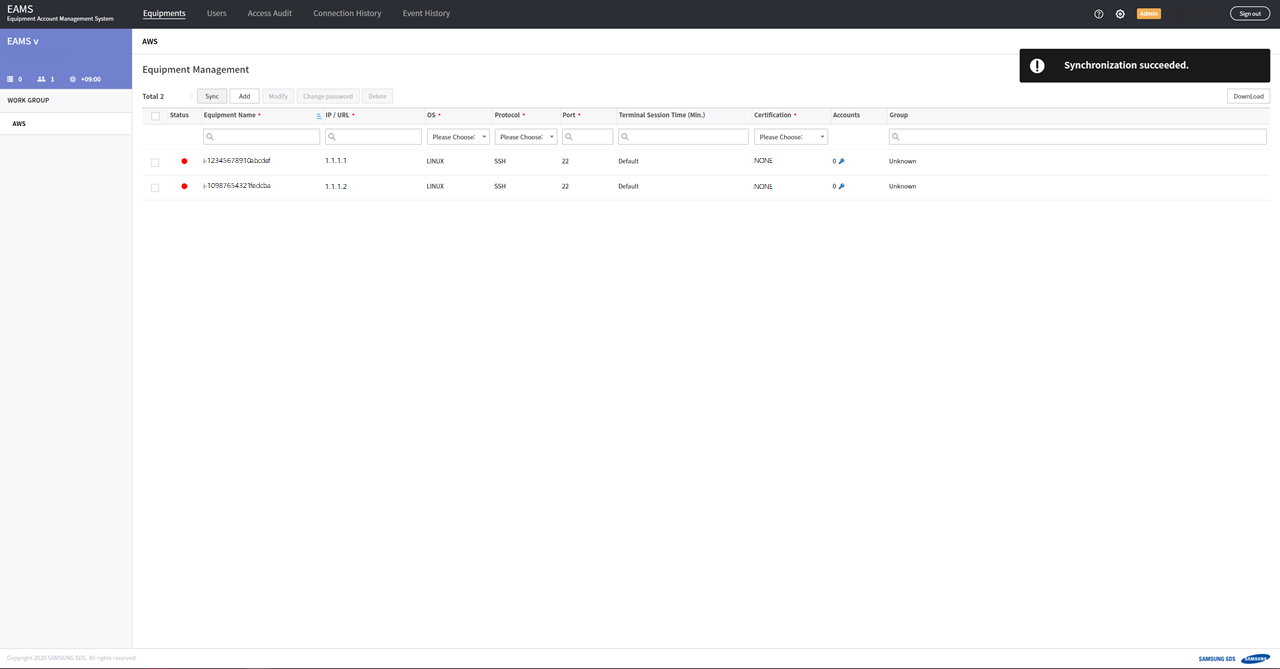
If it successful discovery, you will see a list of AWS console instances in equipment tab.
If it ends up failing, it’s probably because of privileges or network problem, so check it.
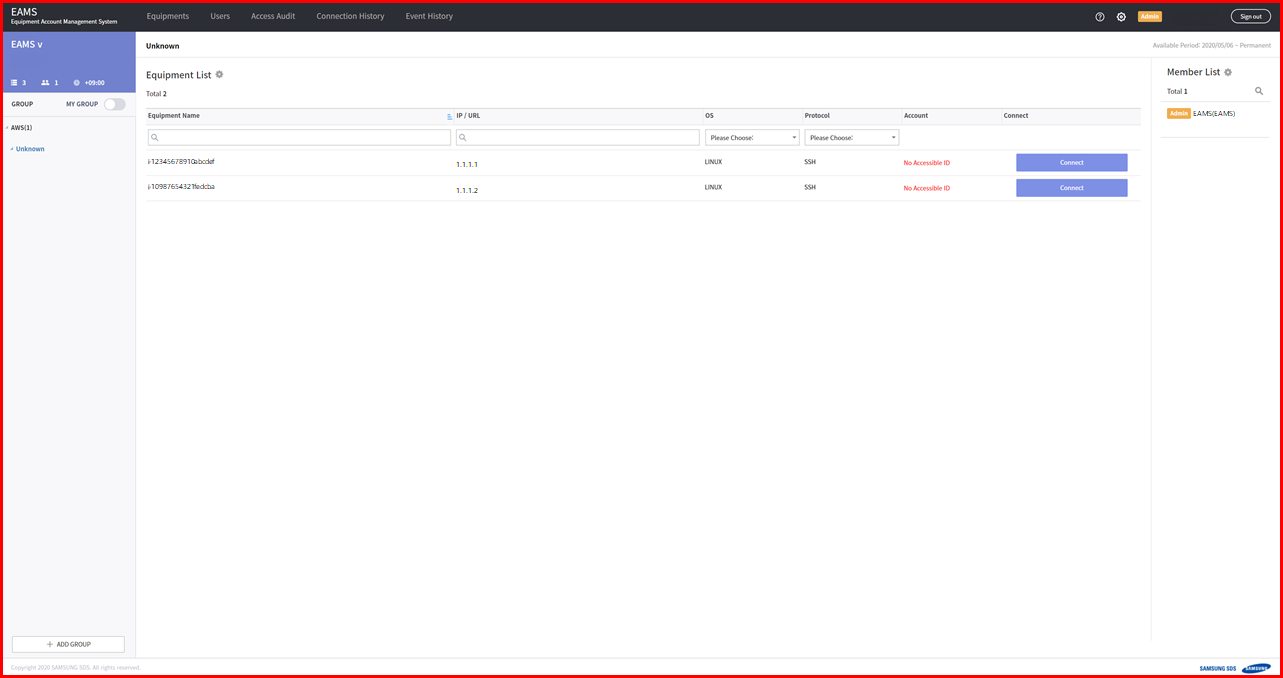
Equipments are visible on the HOME page. And each equipment has a connect buttons on the right.
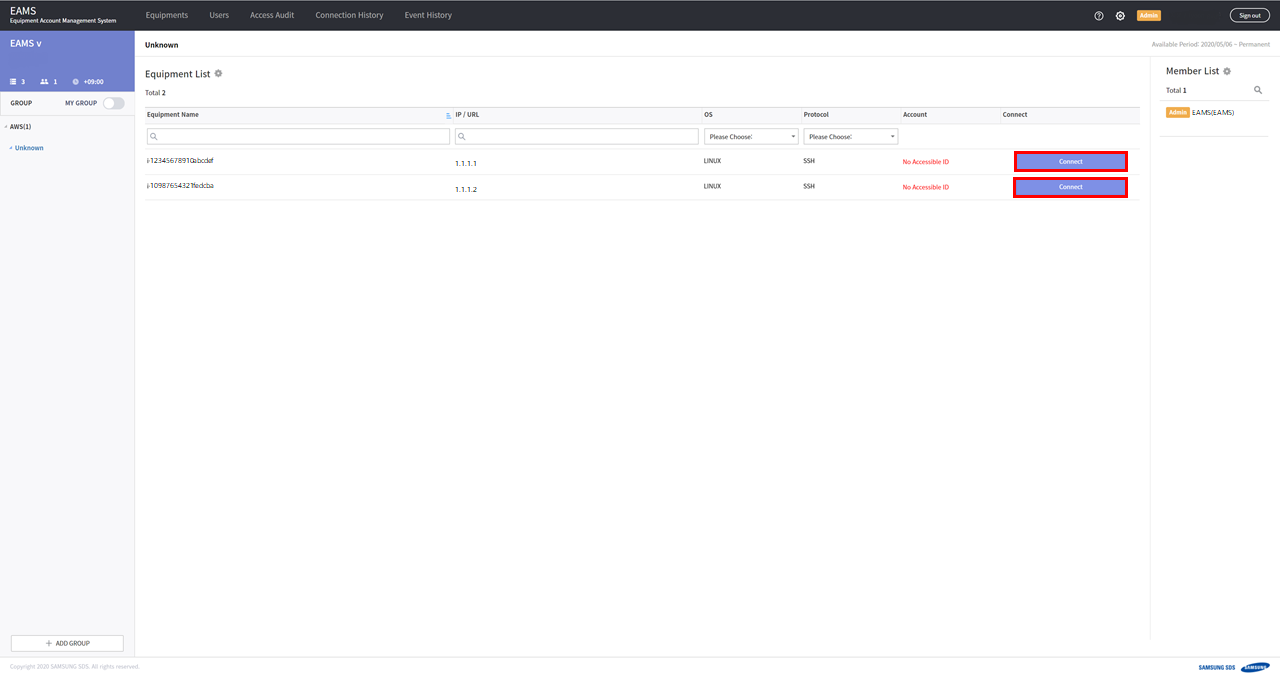
Click the connect button.
Enter the ID/Password of the instance.
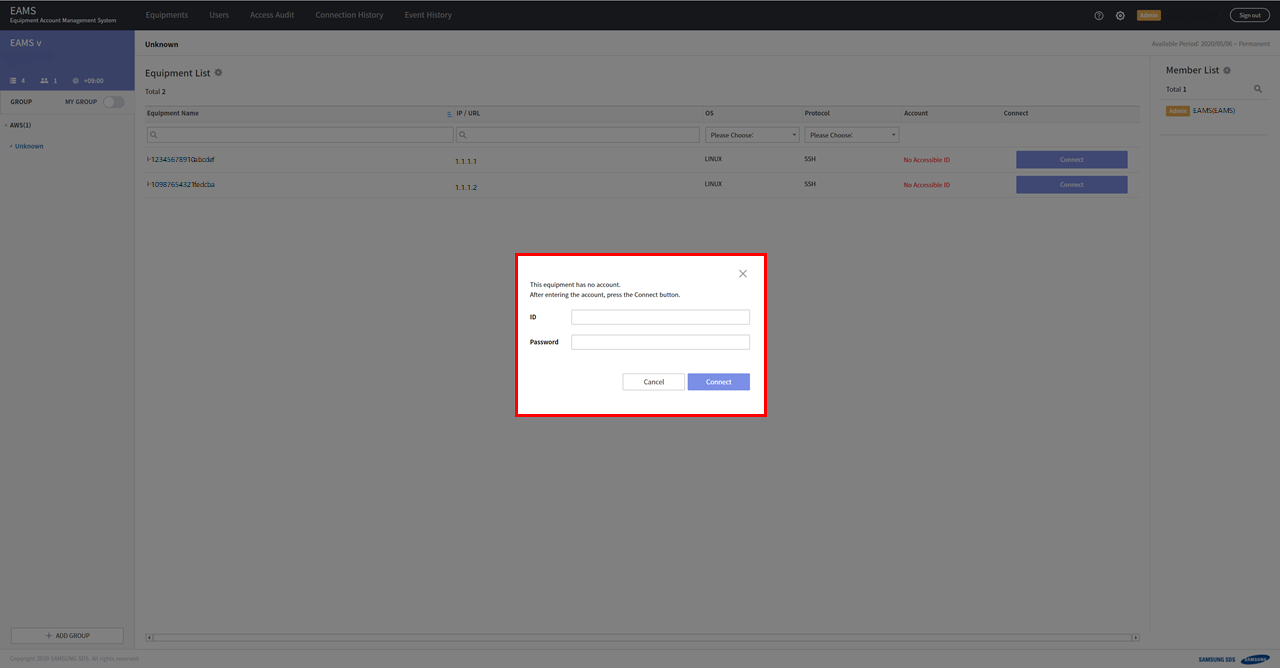
If you see the terminal screen, you have successfully connected to the hosts through EAMS.

1.3. When you cannot connect to the hosts
1.3.1. SSH
-
Check if communication from EAMS to host
execute this command in EAMS server
telnet [host ip] 22
for example : telnet 1.1.1.1 22
When connecting normally :
$ telnet [host ip] 22
Connected to [host ip]]
Escape character is '^]'
When cannot connecting :
$ telnet [host ip] 22
telnet: connect to address [host ip]: Connection timed out
If not connected, configure network inbound for AWS EC2
-
Check if Password Authentication
execute this command in EAMS server
$ cat /etc/ssh/sshd_config | grep PasswordAuthentication
If PasswordAuthentication is "no", set to "yes"
PasswordAuthentication yes
Restart ssh daemon
$ systemctl restart sshd
or
$ service sshd restart
1.3.2. RDP
-
Check if communication from EAMS to host
run this command in EAMS server
telnet [host ip] 3389
When connecting normally :
$ telnet [host ip] 3389
Connected to [host ip]]
Escape character is '^]'
When cannot connecting :
$ telnet [host ip] 3389
telnet: connect to address [host ip]: Connection timed out
If not connected, configure network inbound for AWS EC2
-
Check if you have set an account password
-
In the Start screen, run
lusrmgr.msc -
Click
Users -
Right click on your account and click
"Set Password" -
Set password
-
Or run this command on CMD
> net user [account] [password]
for example : net user eamsadmin asdf1#
-
Check if your account is in remote desktop group
-
In the Start screen, run
lusrmgr.msc -
Click
Groups -
Add your account in
"Remote Desktop Users"
-
Or run this command on CMD
> net localgroup "Remote Desktop Users" [account] /add
for example : net localgroup "Remote Desktop Users" eamsadmin /add
-
Check if 'Authenticated Users' is in 'Access this computer from the network'
-
In the Start screen, run
secpol.msc -
Security Settings>Local Policies>User Rights Assignment -
Double click
"Access this computer from the network" -
Click
"Add User or Group" -
Enter "Authenticated Users" and click OK.
-
-
Check if not using NLA
-
In the Start screen, run
sysdm.cpl -
Click
RemoteTab -
Check "Allow connections from computers running any version of Remote Desktop"
-
Uncheck "Allow connections only from computers running Remote Desktop with Network Level Authentication"
-
2. Using Web Terminal
Web terminal provides TEXT copy / paste and file transfer service.
Chrome extensions are available for convenient use of these terminal features.
We recommend using the chrome extension. You only need to install the chrome extension once.
You can download the extension installation file from the EAMS web.
2.1. Using Clipboard
You can copy / paste text between your terminal and your pc.
2.2. File Transfer
You can transfer files between your terminal and your pc using EAMS Object Storage.
|
upload : User PC → EAMS Storage → Equipment download : Equipment → EAMS Storage → User PC |
Conditions for file transfer :
1) Communication via 8443 port from instance to EAMS
2) If your host is unix, install curl
2.2.1. File upload
For Linux/Unix :
-
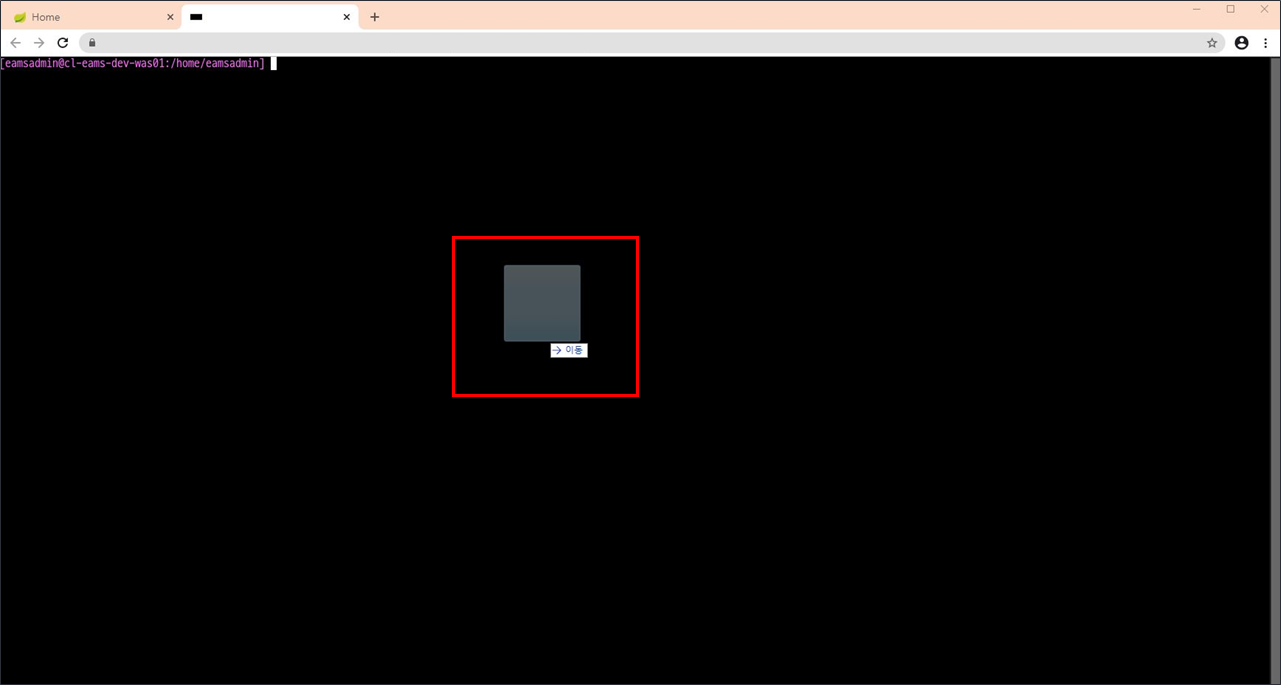
Drag and drop the file to upload to the terminal.
-
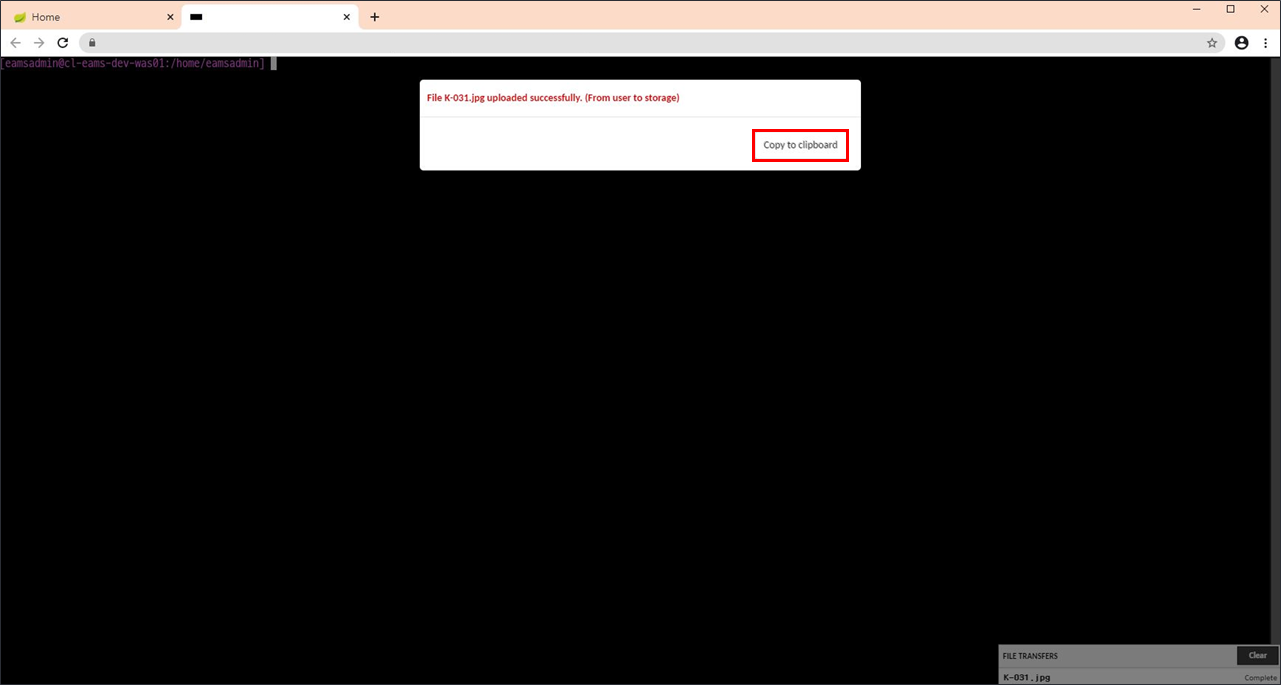
File transfer proceeds and a pop-up message appears when the transfer is complete (File transfer: User PC → EAMS Storage)
-
Click the Copy To clipboard button in the pop-up message.
-
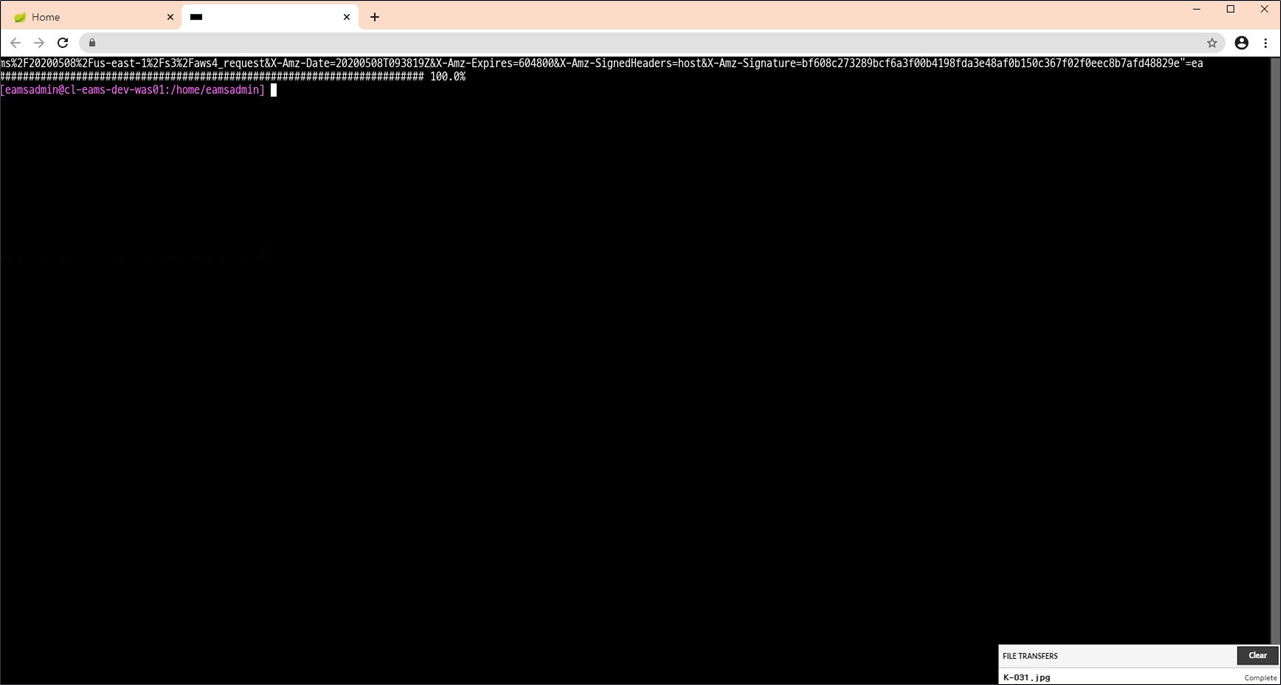
Right-click or paste to paste the path saved in the clipboard to the terminal.
-
Press Enter, the file is downloaded to the device through the curl command. (File transfer: EAMS Storage → Equipment)
For Windows :
-
Drag & Drop the file to upload onto the terminal.
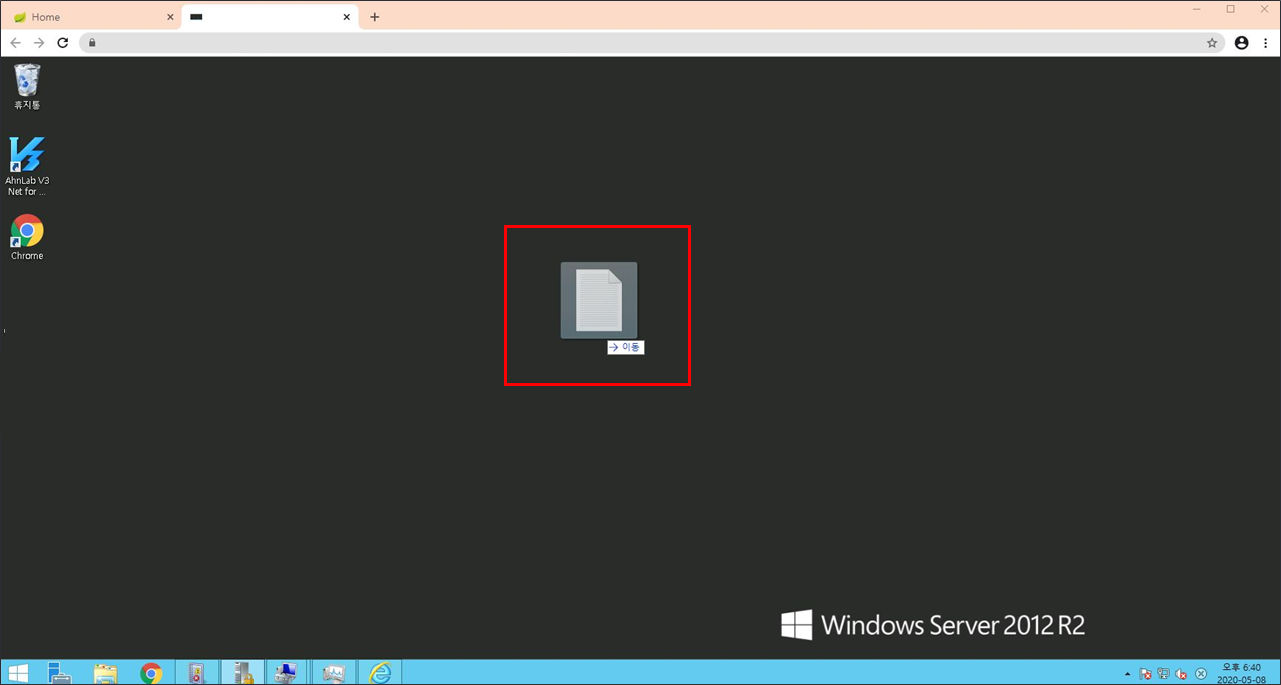
-
File transfer proceeds and a pop-up message appears when the transfer is complete (File transfer: User PC → EAMS Storage)
-
Click the Copy To clipboard button in the pop-up message.
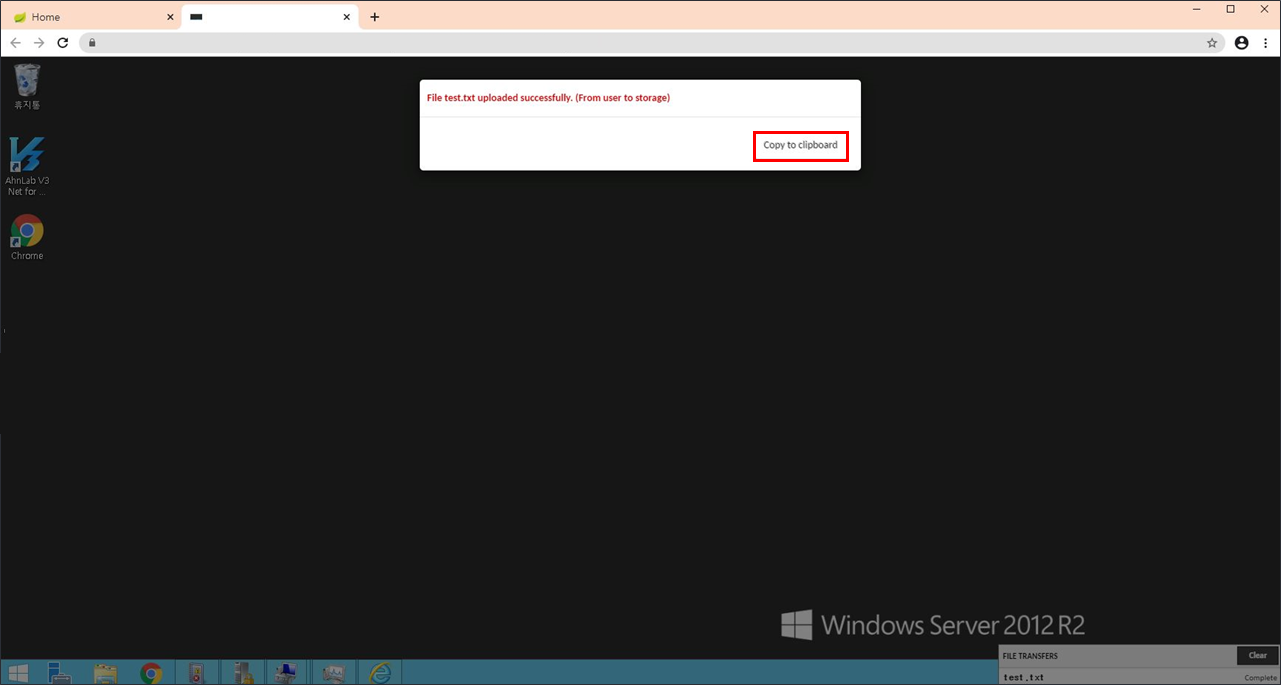
-
Run the browser (IE / Chrome / Firefox) installed in Windows and paste the path saved in clipboard in the address bar.
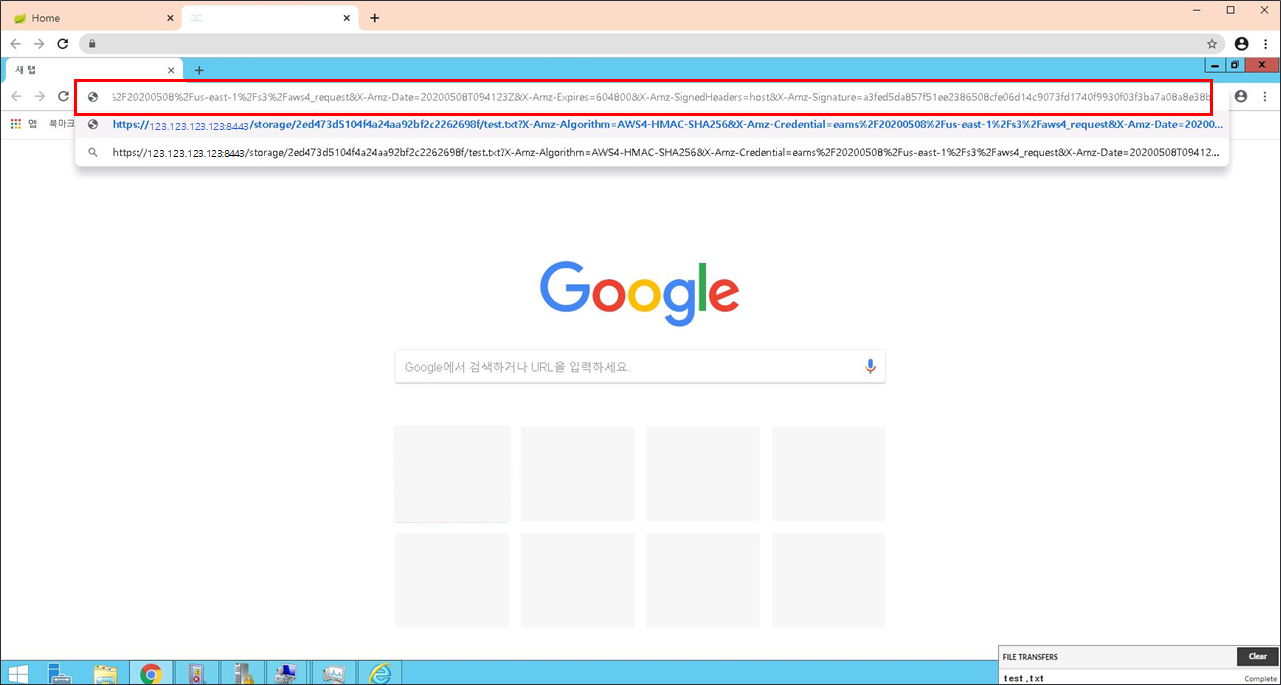
-
If a warning page appears, click Go to (Unsafe) at the bottom of the page to start the download.
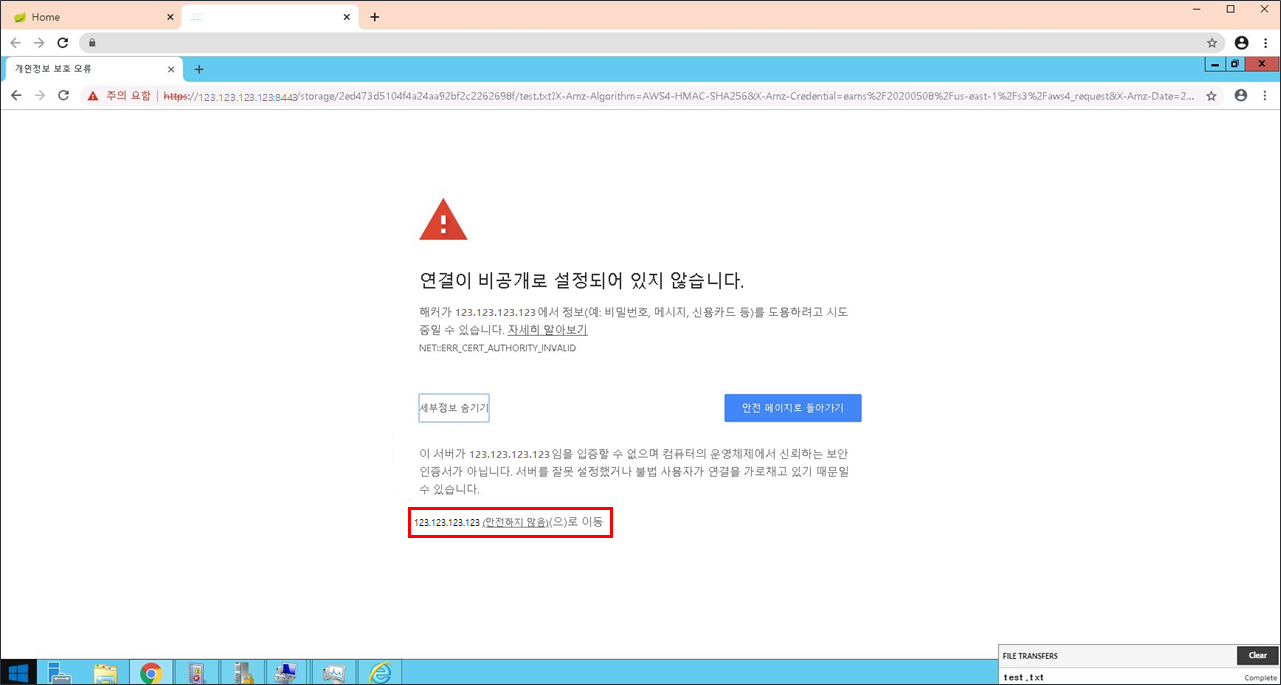
-
Download the file to the equipment through the browser’s file download.(File transfer: EAMS Storage → Equipment)
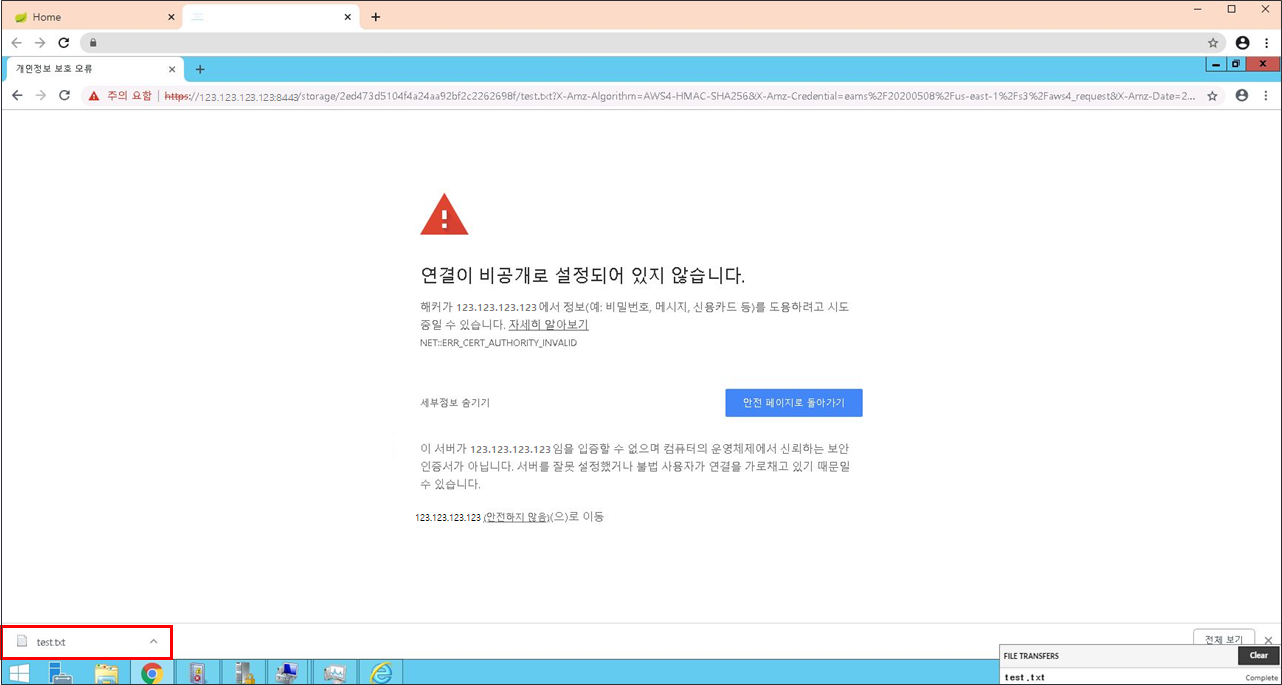
-
Open the folder and open the download folder to check the downloaded file.
2.2.2. File download
For Linux/Unix :
-
Pressing Ctrl + Alt + Shift brings up the EAMS menu.
-
Double-click the file to download from the file list on the Device tab.
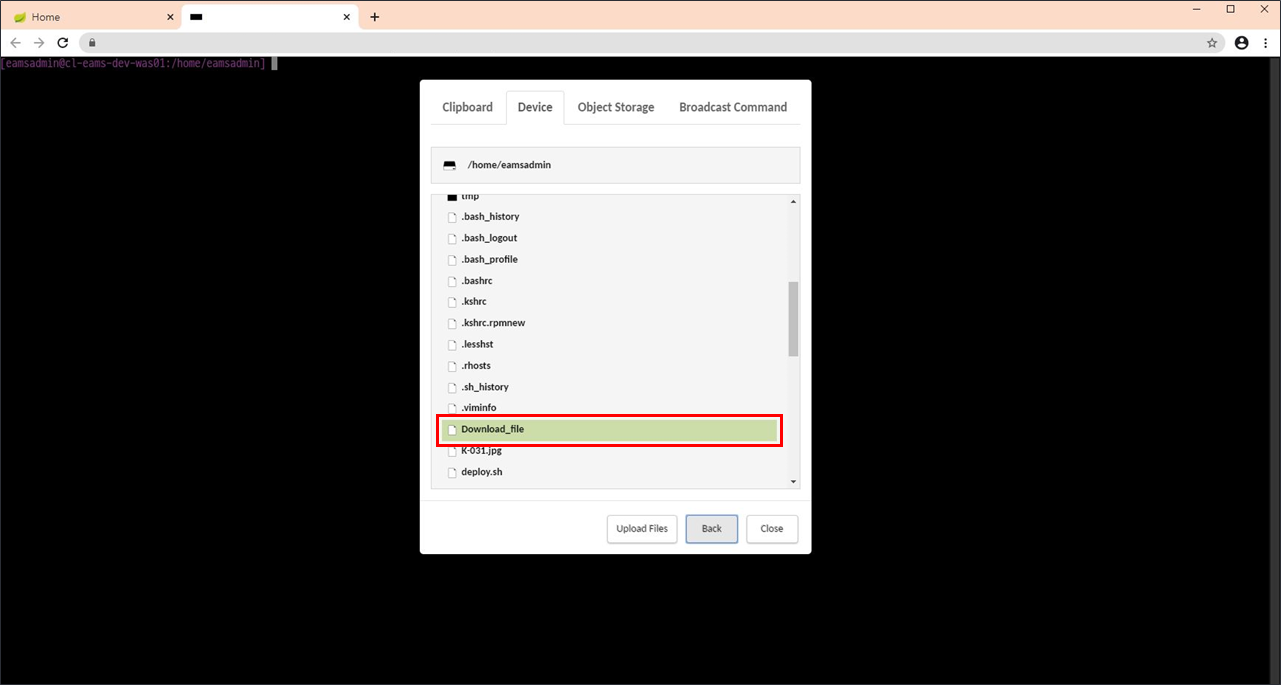
-
If you double-click, the link to be downloaded from the equipment to EAMS Storage is automatically saved in the clipboard.
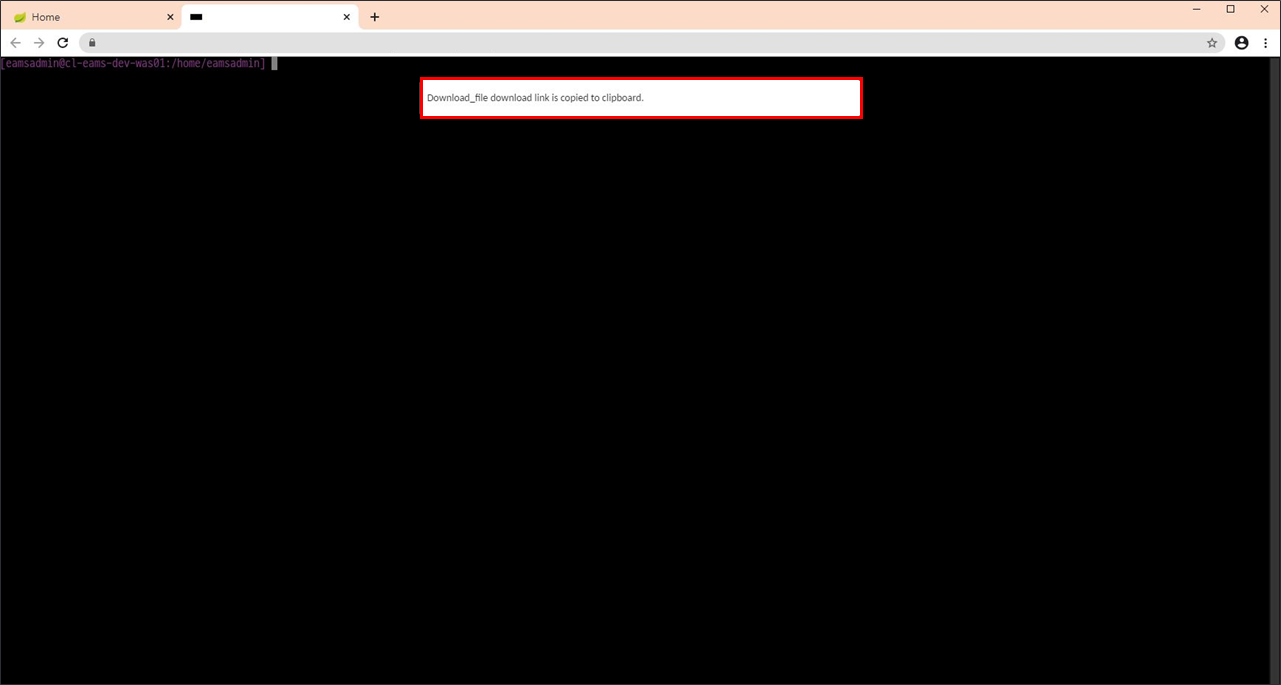
-
Right-click or paste to paste the path saved in the clipboard to the terminal.
-
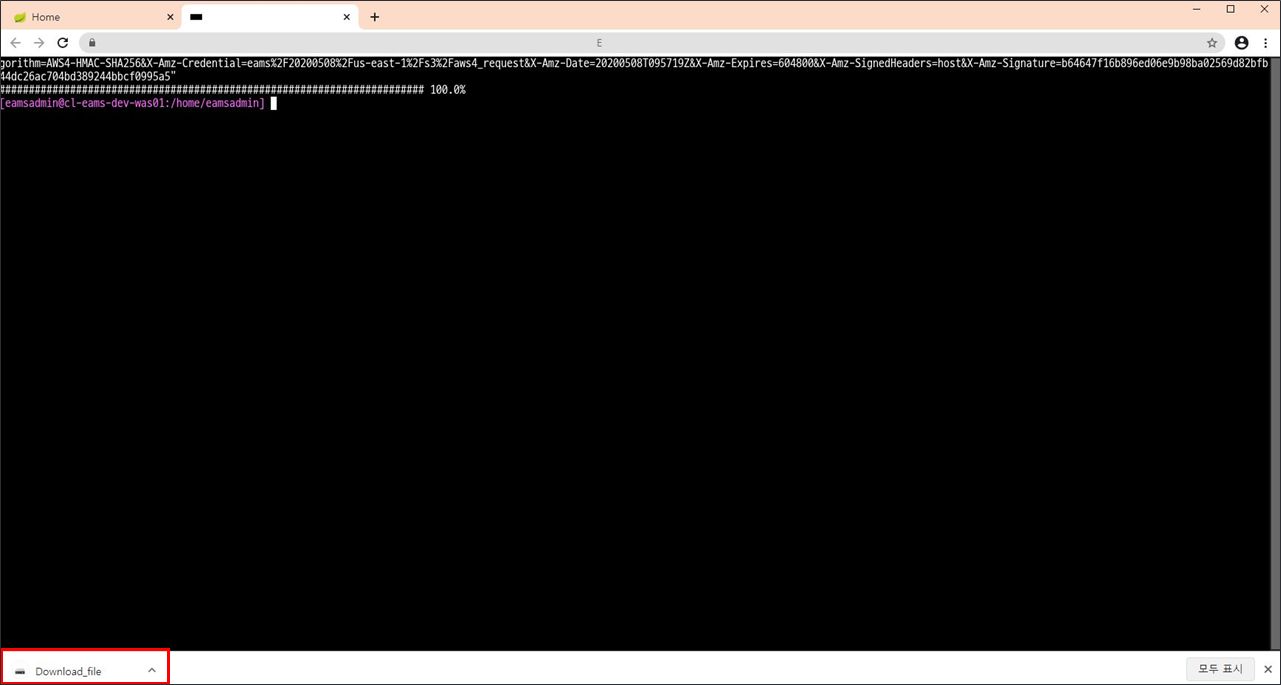
If you press Enter, it is downloaded to EAMS Storage through curl command. (File transfer: Equipment → EAMS Storage)
-
When downloading to EAMS Storage is completed, a pop-up message appears.
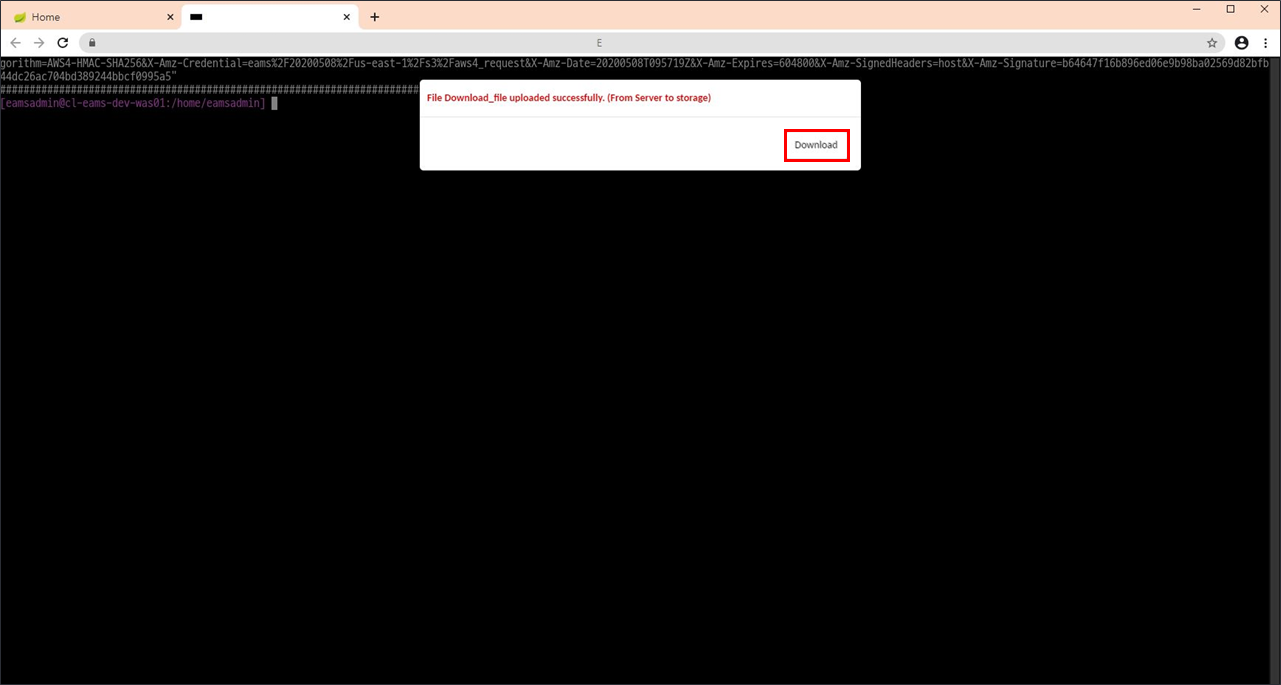
7.Click the Download button to download it to your PC. (File transfer: EAMS Storage → User PC)
For Windows :
-
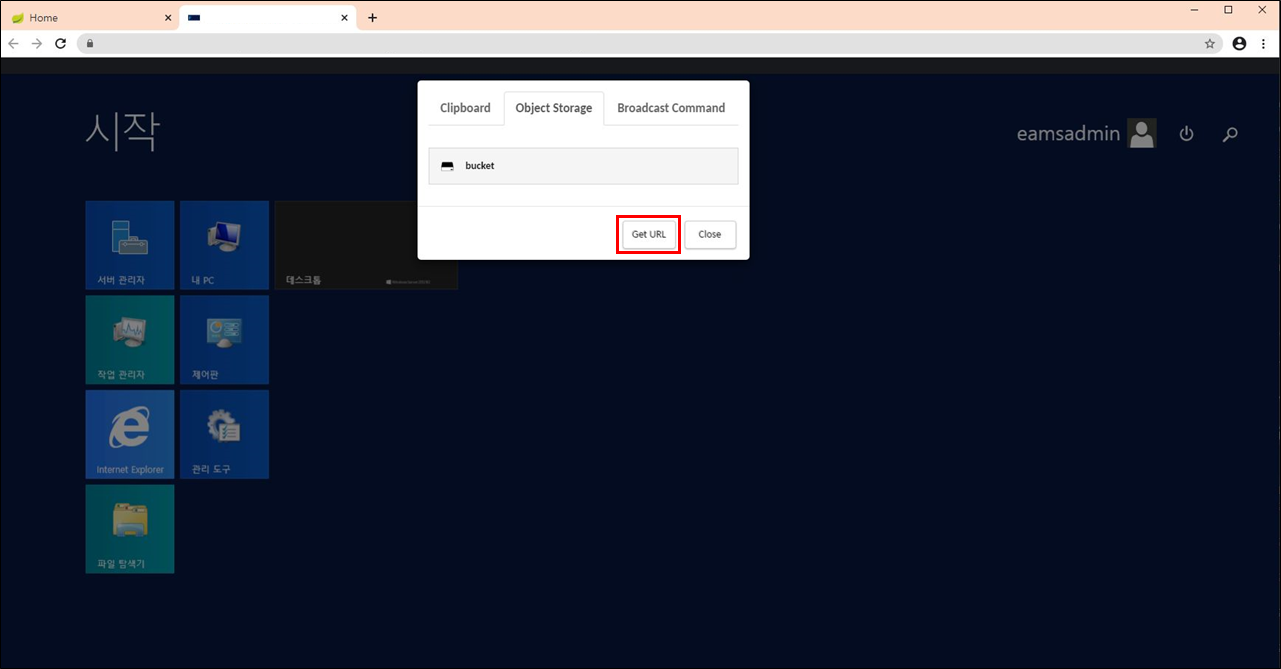
To download files on the equipment, you must use the EAMS upload page. Click the Get URL button under the Object Storage tab of the EAMS Menu.
Pressing Ctrl + Alt + Shift brings up the EAMS menu.
-
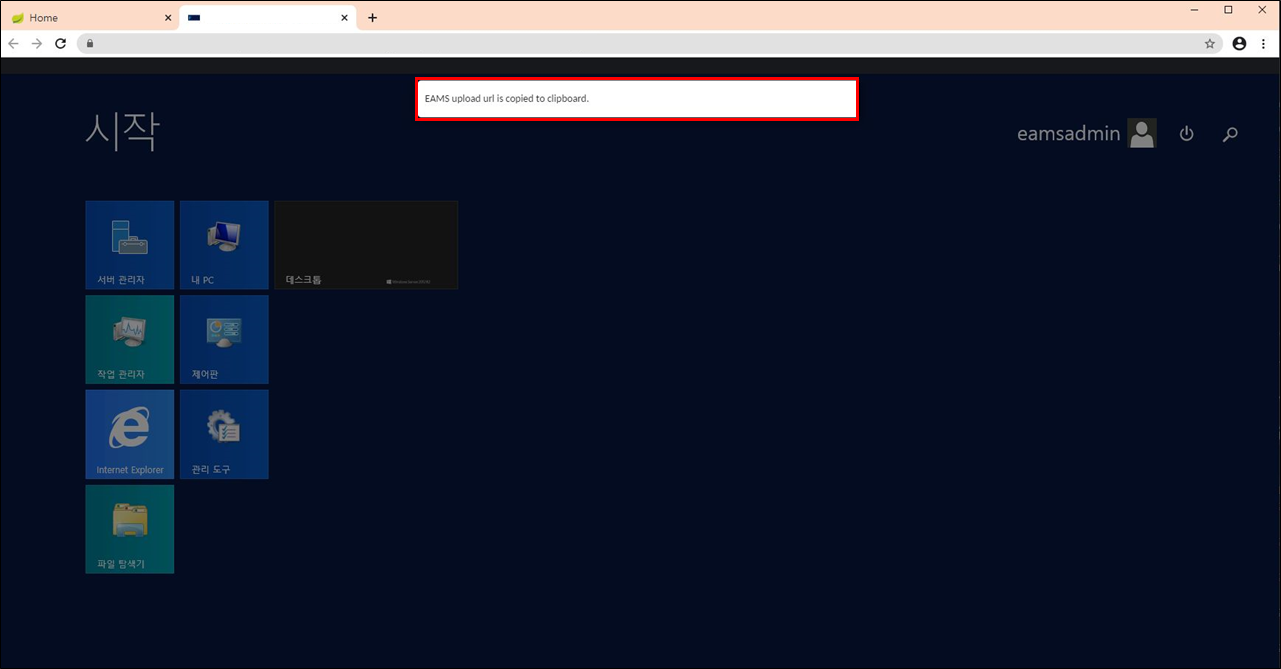
Clicking the Get URL button copies the EAMS upload page address to the clipboard.
-
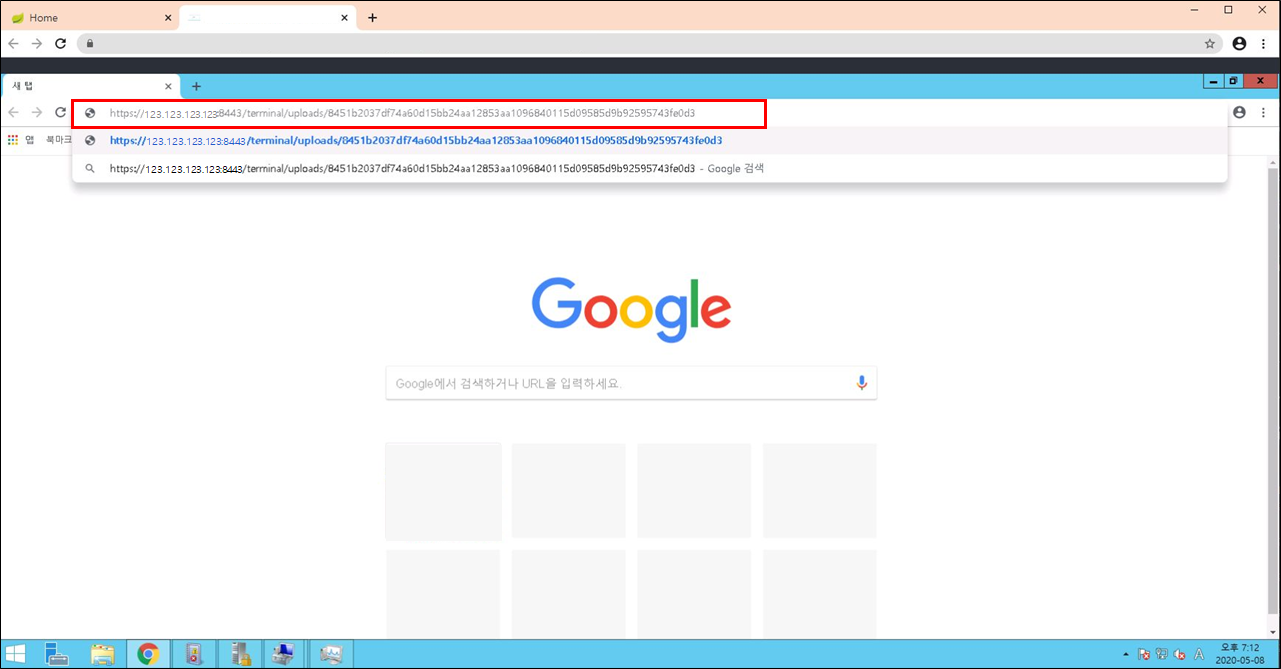
Run Browser (IE / Chrome / Firefox) and paste the address stored in the clipboard into the address bar.
-
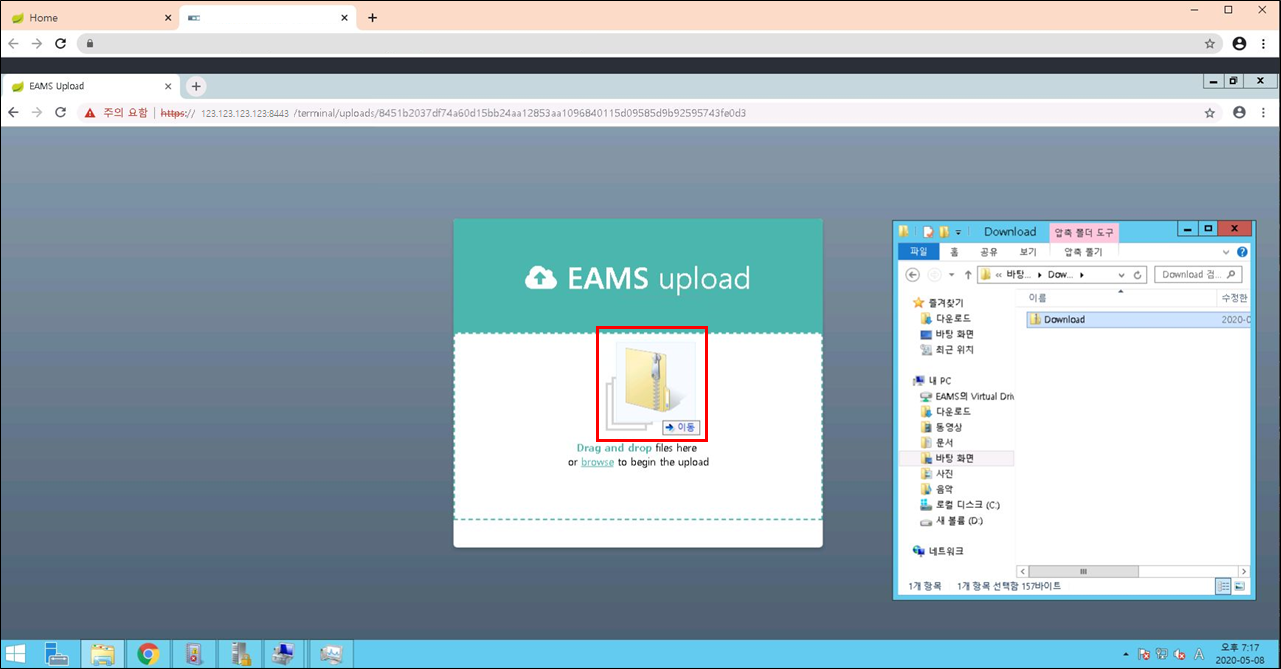
Drag & Drop or click browse link to upload the file to download in the middle of the EAMS upload page.
-
The upload progress is displayed, and when completed, a check mark appears. (File transfer: Equipment → EAMS Storage)
-
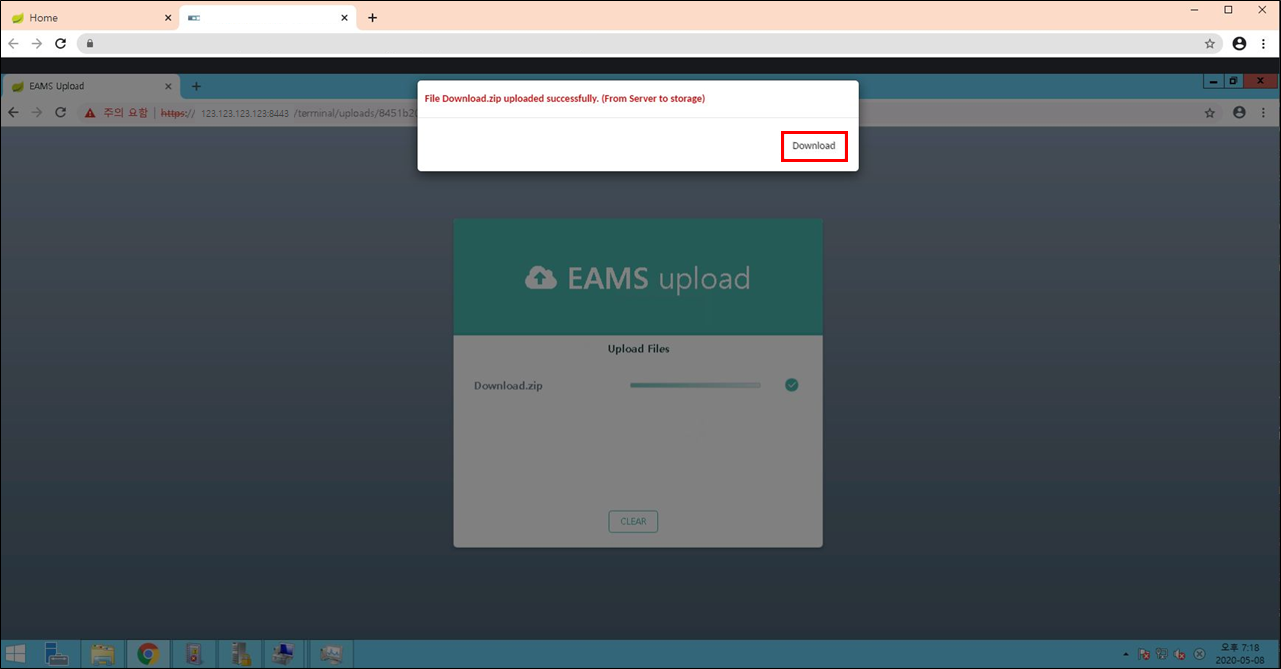
When uploading to EAMS Storage is completed, a pop-up message appears.
-
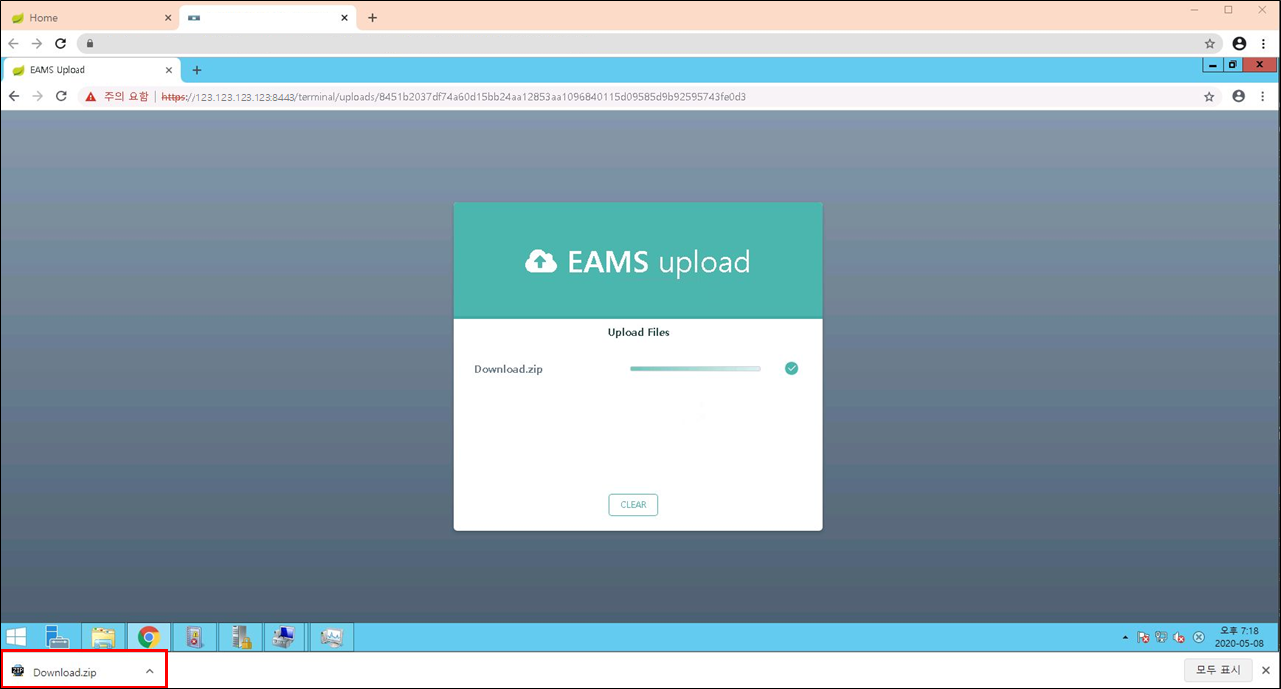
Click the Download button to download it to your PC. (File transfer: EAMS Storage → User PC)
3. Connect Equipments
When connecting to the equipment, you click the connect button and enter the ID and password.
If it is troublesome to input each time you access the equipment, you can save the connection information and access it immediately.
3.1. Registering accounts manually for quick connection.
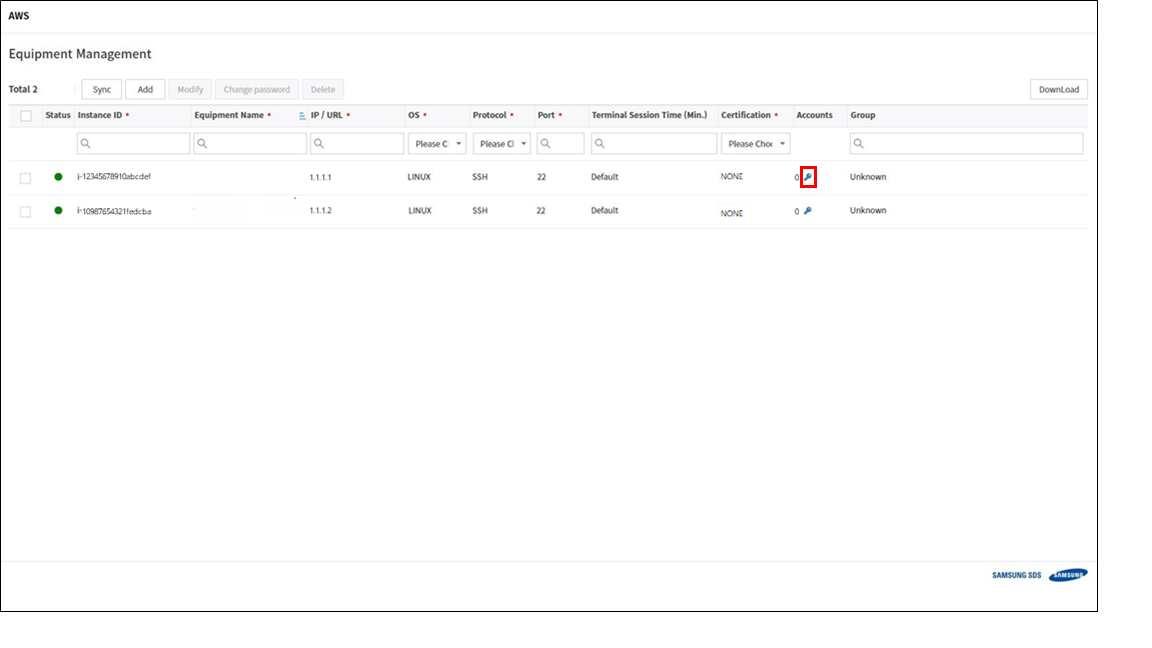
Enter Equipments Tab
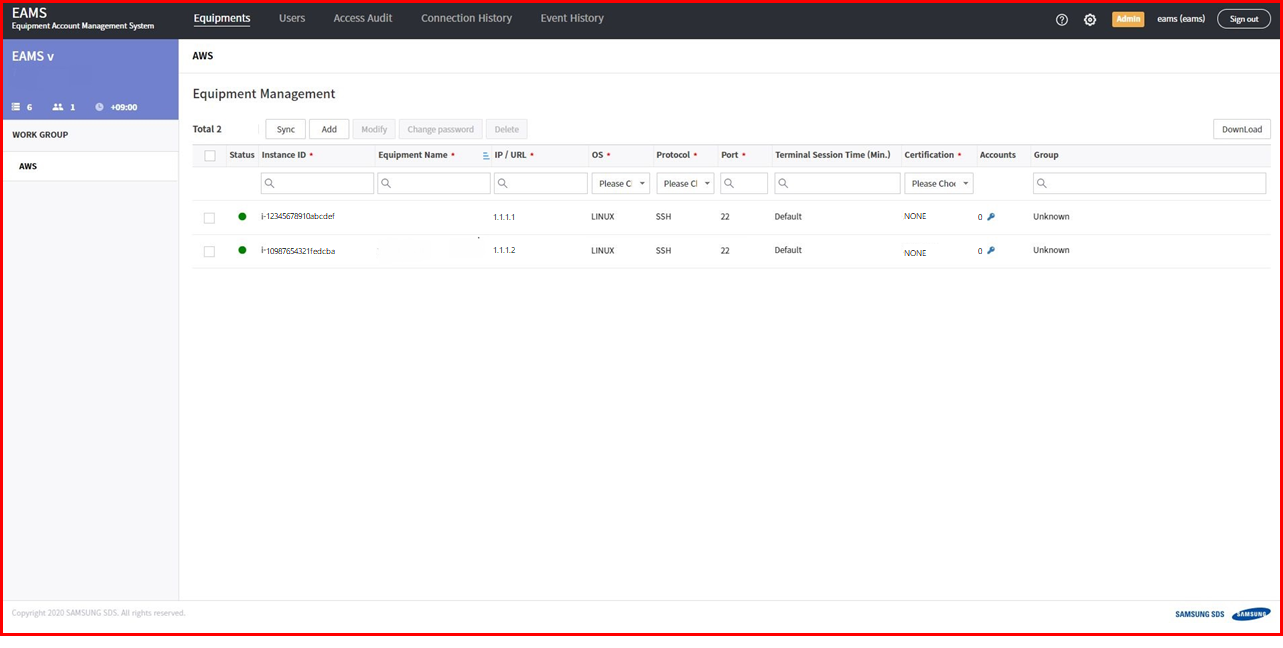
You can see the equipments list. and click the key icon.
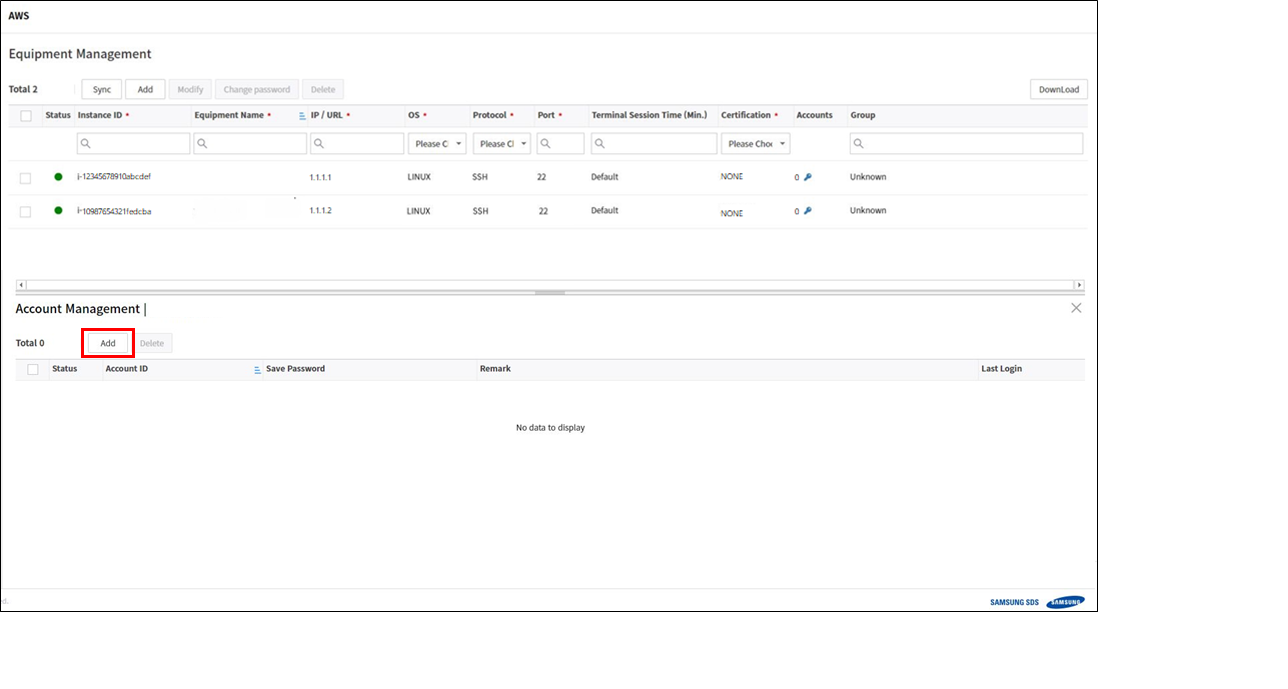
Click add button.
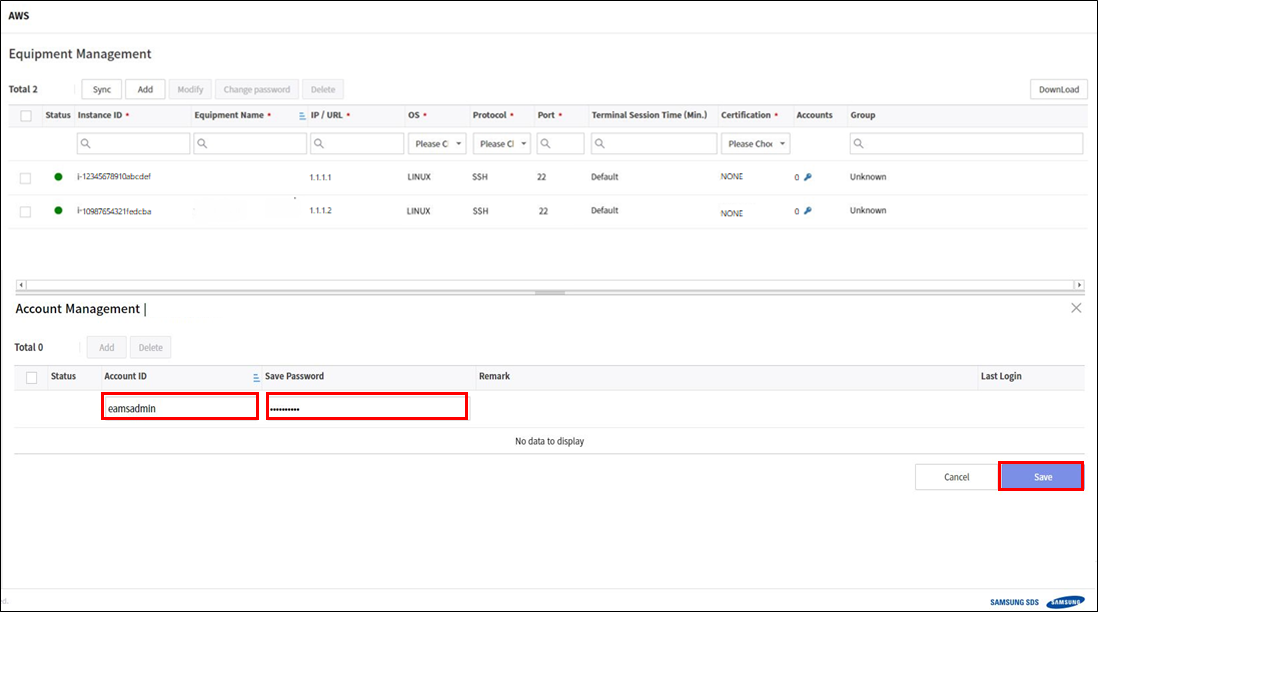
Enter the id/password of instance and click save button. If you only want to save the account, do not enter the password.
Let’s go back to the home screen and check the connection.
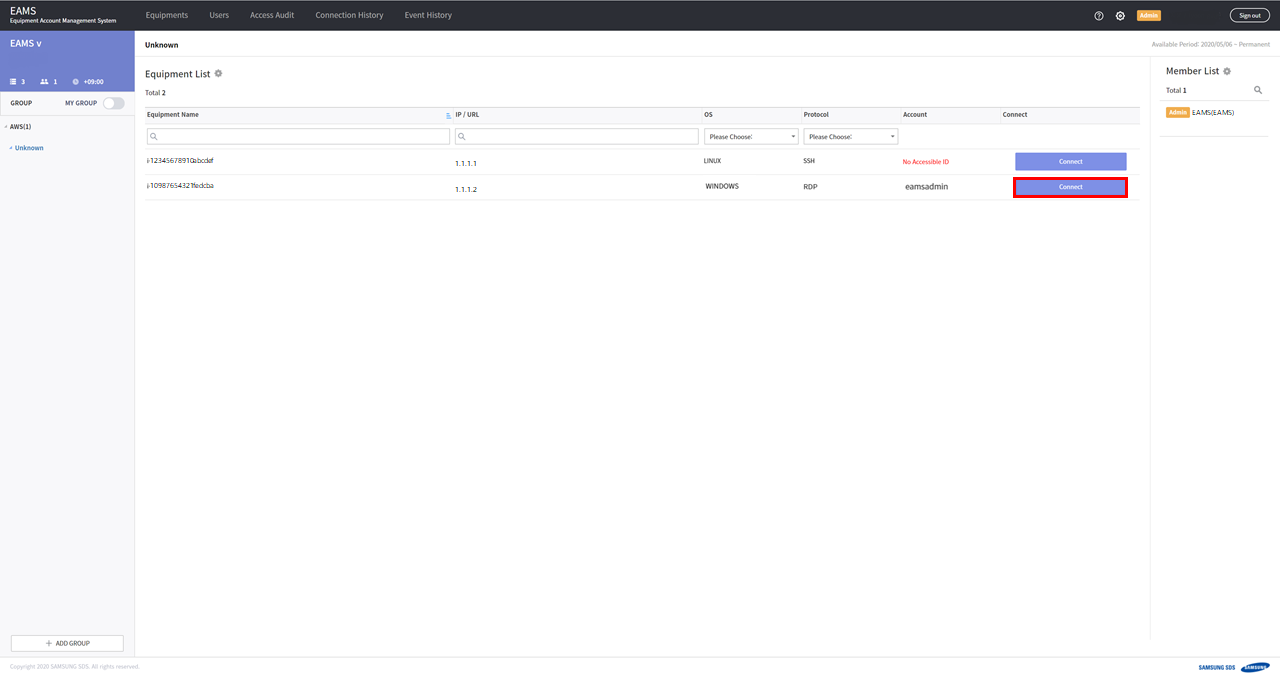
Connect to the equipment you registered your account information, so you can access immediately.
3.2. Registering accounts automatically using SSM for quick connection.
If your instances use SSM service, eams can get accounts of the instances through SSM. First, EAMS to use the SSM service, you need to change the equipment settings.
Enter Equipments Tab
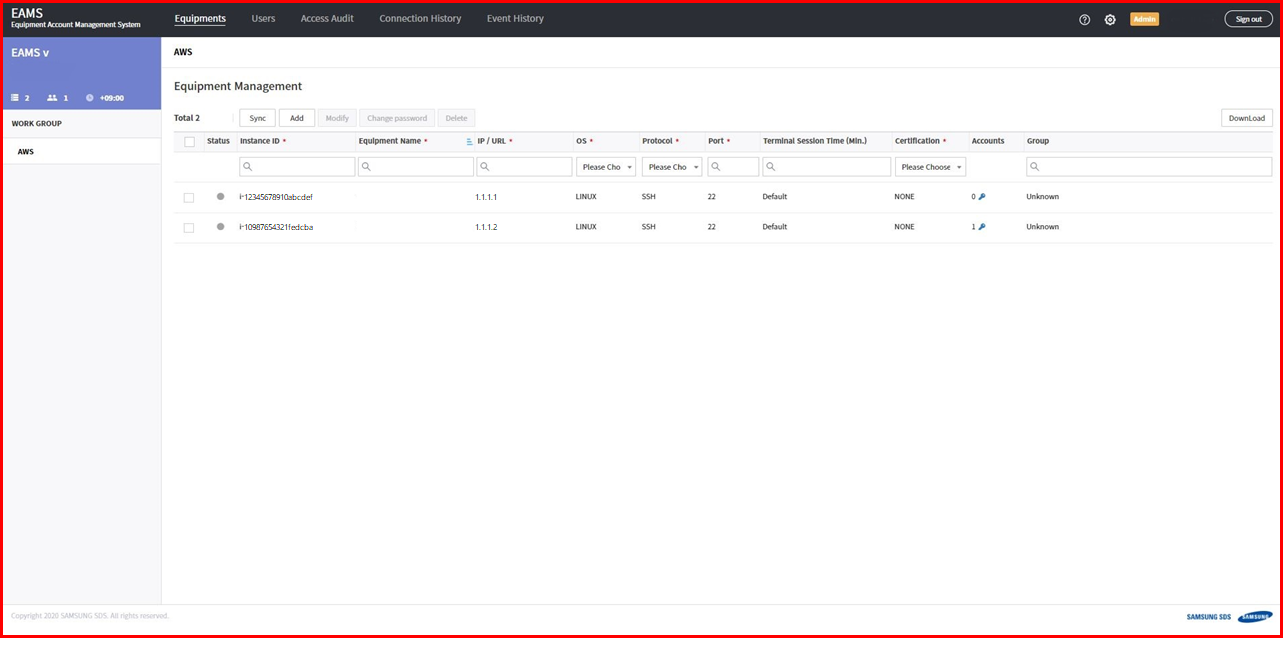
Check the check box the equipment and Modify button.
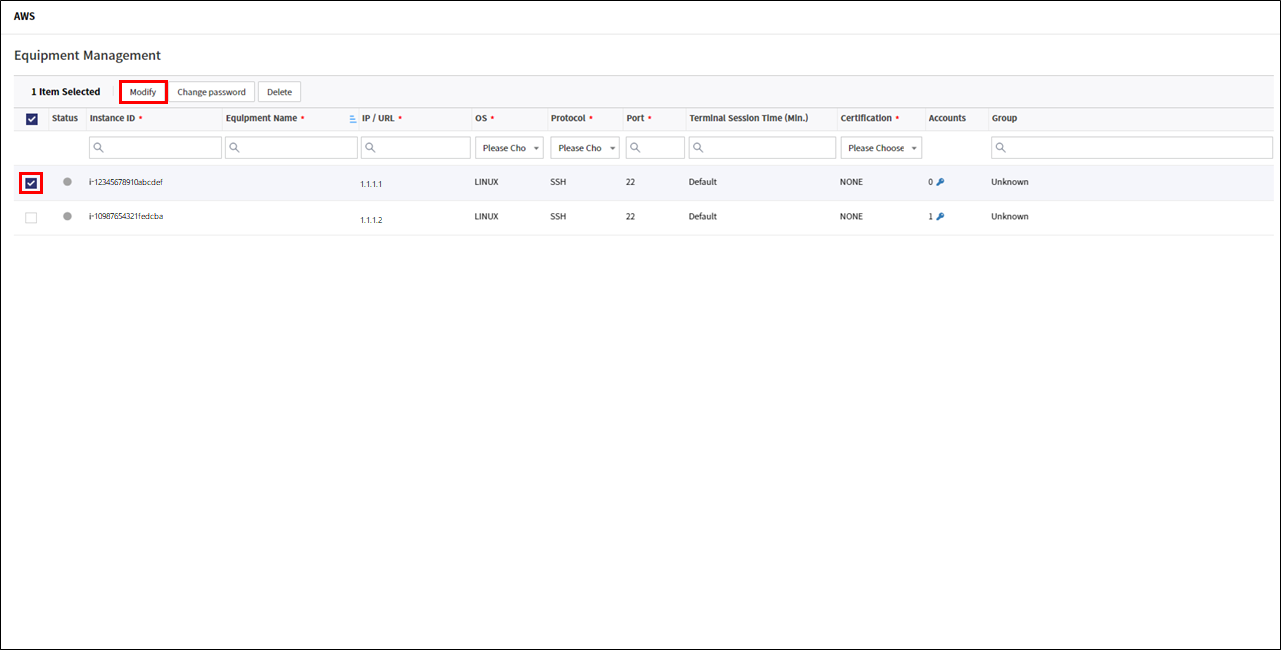
Change certification from NONE to AWS-SSM type.
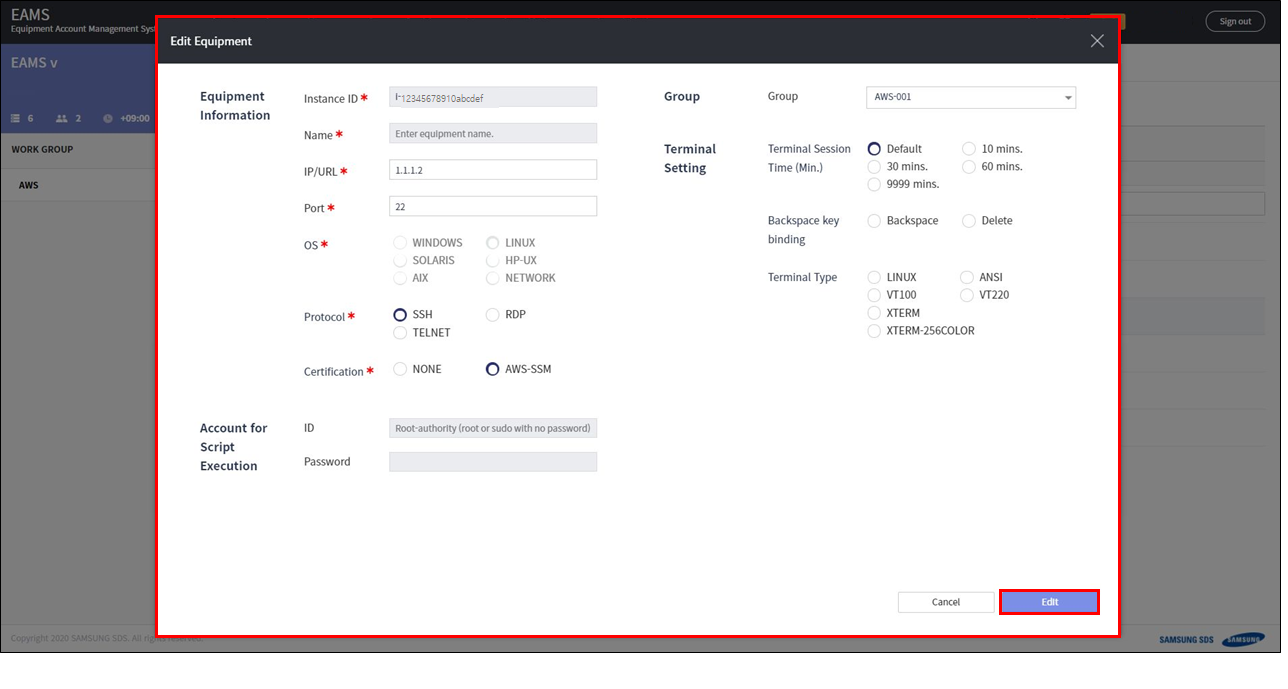
Now EAMS can get accounts of the instance through SSM service.
Next, let’s get accounts of the instance.
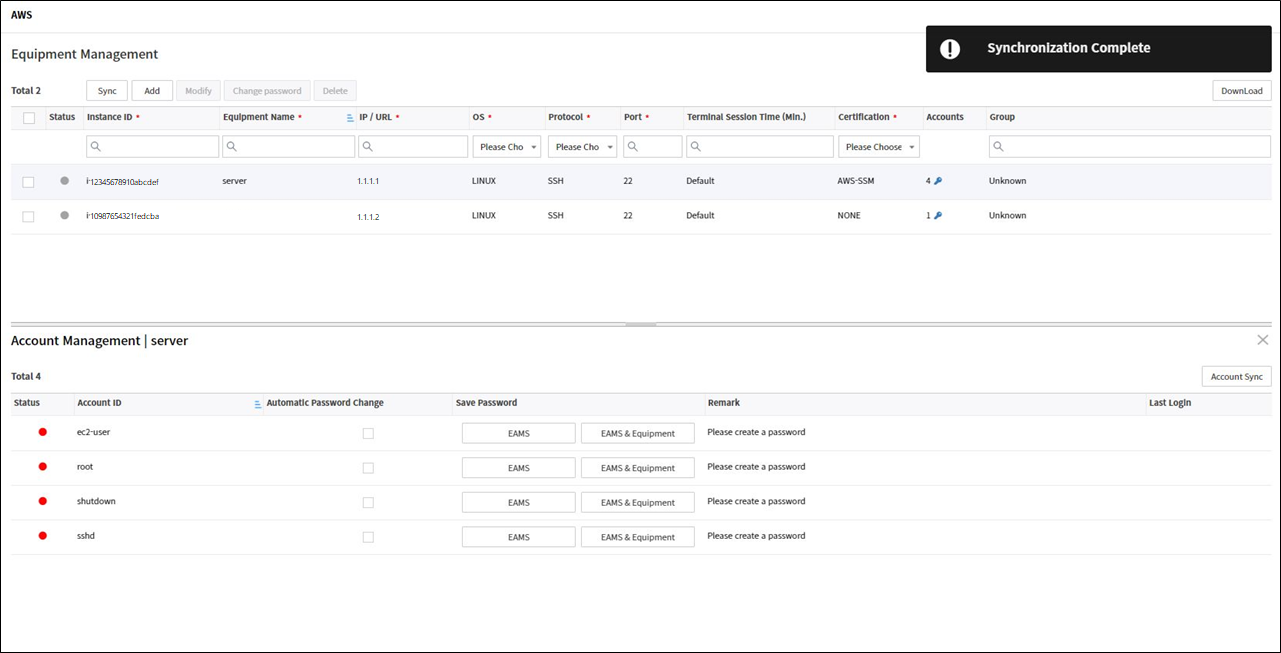
Click the account key of the equipment in Equipments Tab.
Click Account Sync button.
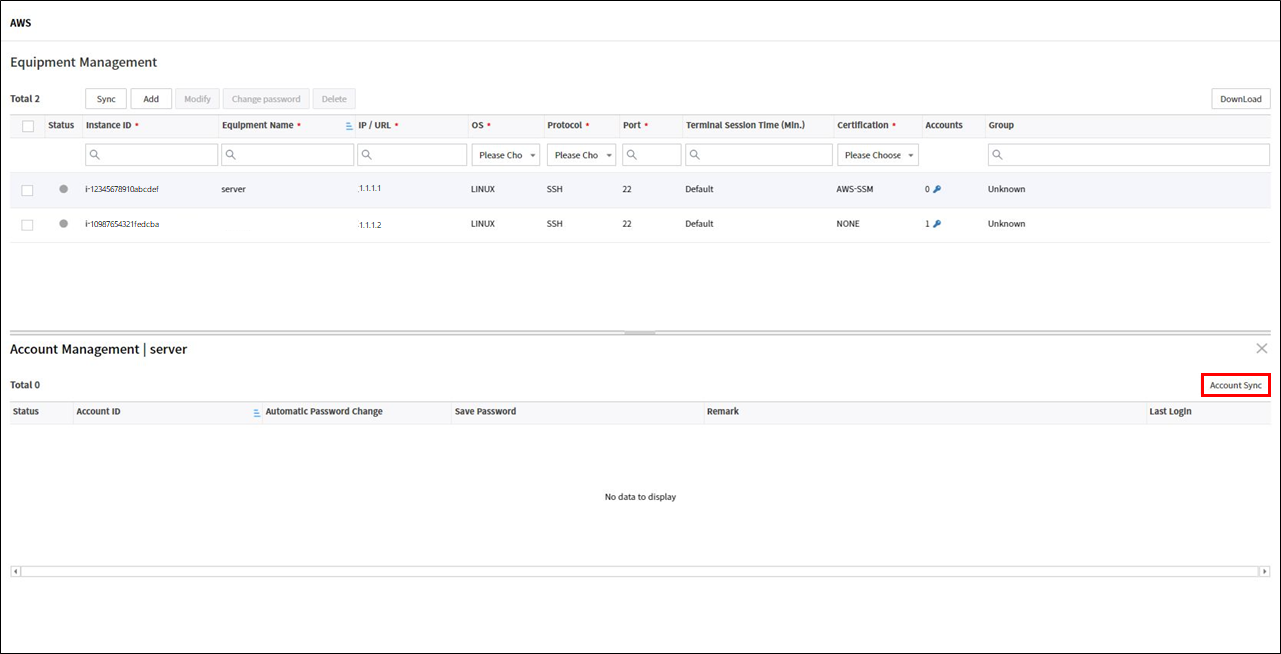
If sync is successful, you can see the accounts list of instance. you can save password of account. If you only want to save the account, do not enter the password.
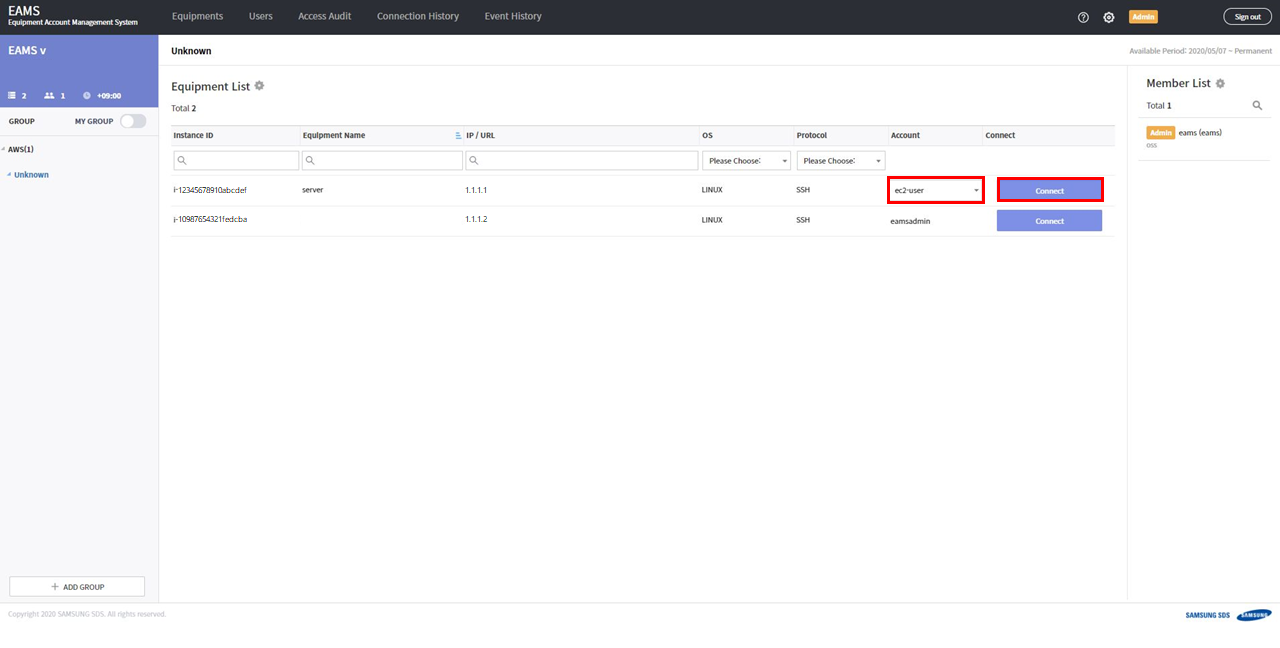
Let’s go back to the main page and check the connection. Connect to the equipment you registered your account information, so you can access immediately.
4. Viewing Access History
4.1. Viewing access audit
You can view the history of other users' instance access.
And the commands executed in the terminal are recorded as text and the work performed in the terminal is recorded as a video.
You can search the connection history by selecting the desired period at the top right of the chart, and up to one month.
-
Go to the Access Audit tab
-
Check connection history. You can download it as a csv file.
5. Register User and Create Group
You can register EAMS users so that others can access your instance through EAMS and you can create groups for access management.
5.1. Register User
Let’s register User.
detail > User management
-
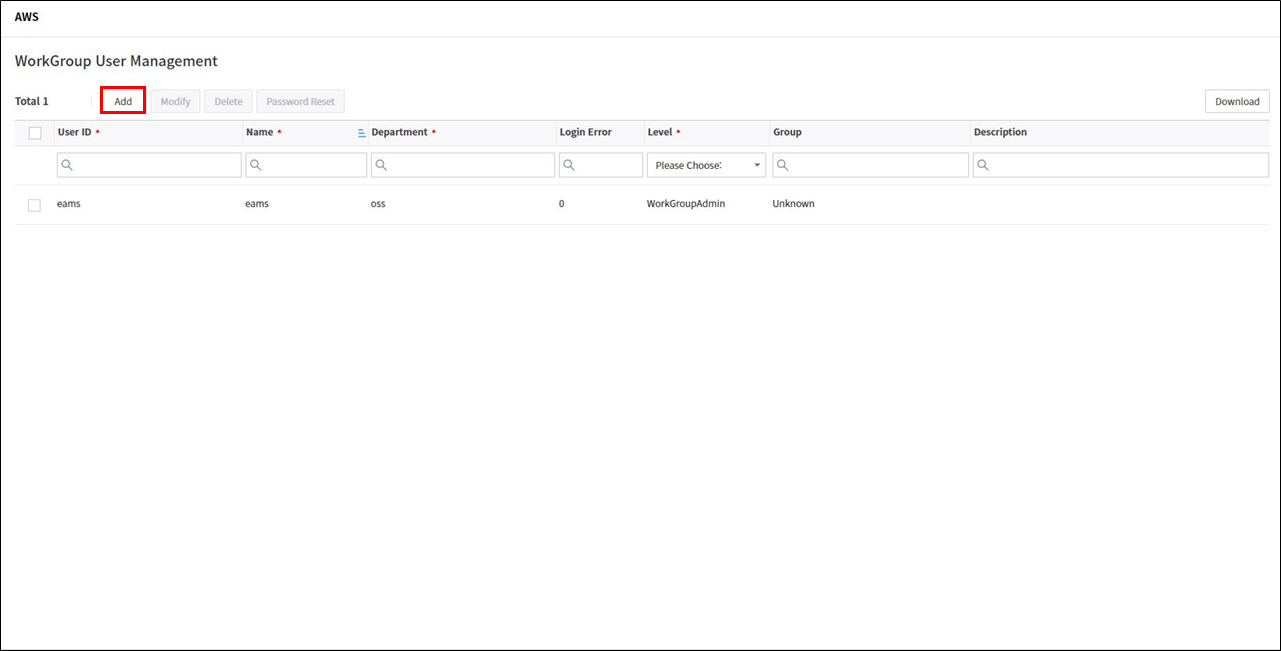
Go to the Users tab.
-
Click the add button.
-
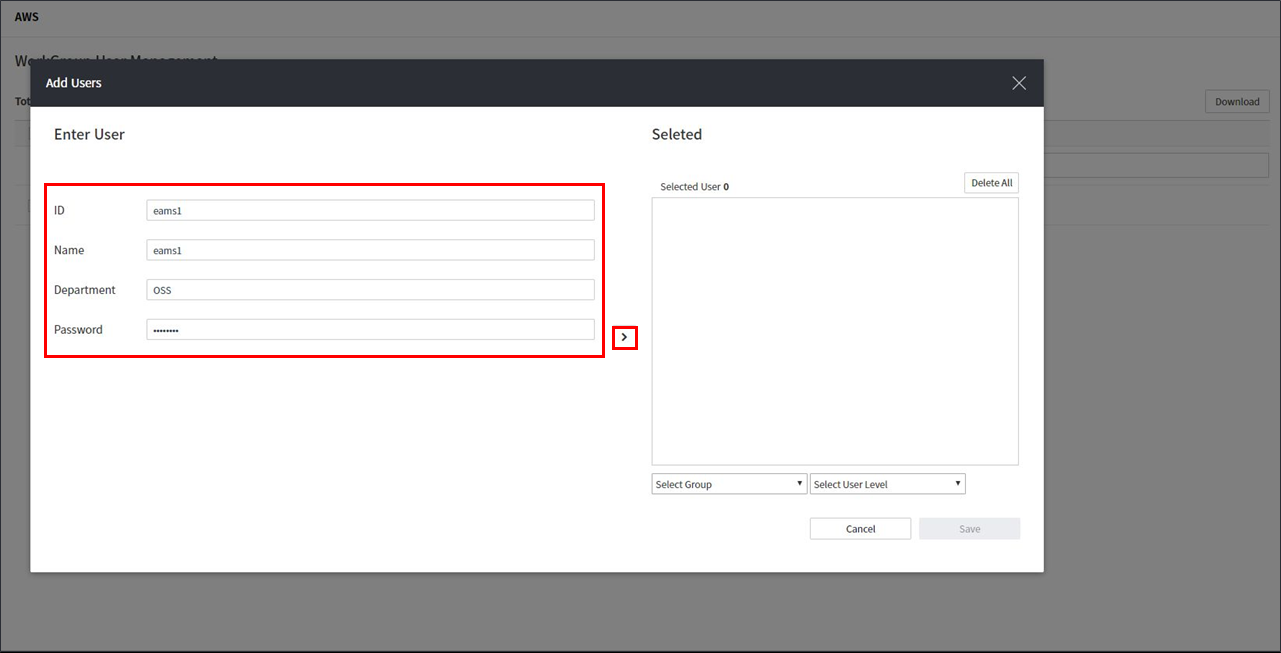
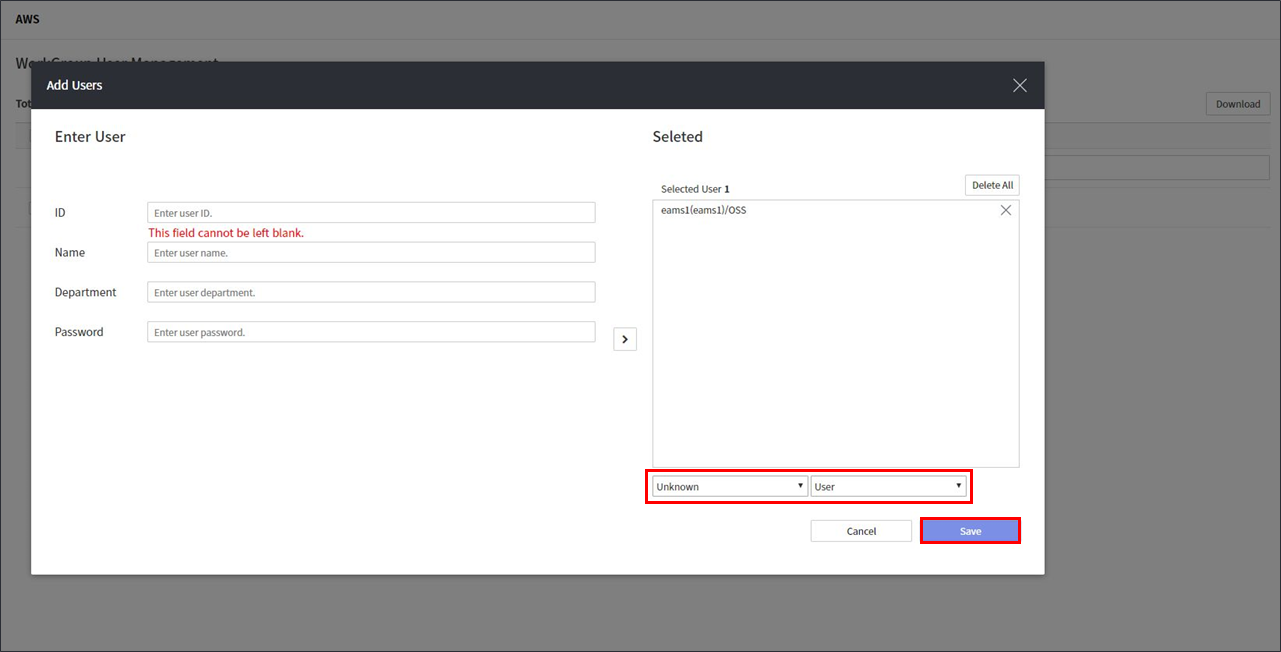
Enter ID, Name, Department, Password information and click
>button.
-
Select Group and User Level and save.
5.2. Create Group
First of all, the concept of Group is a group of instances to separate access.
By separating instances into groups, only users who need access can access instances.
To manage as a group, create a group and map equipment and users to the group.
detail > Group management
Create a group by following the guide below.
-
Create group.
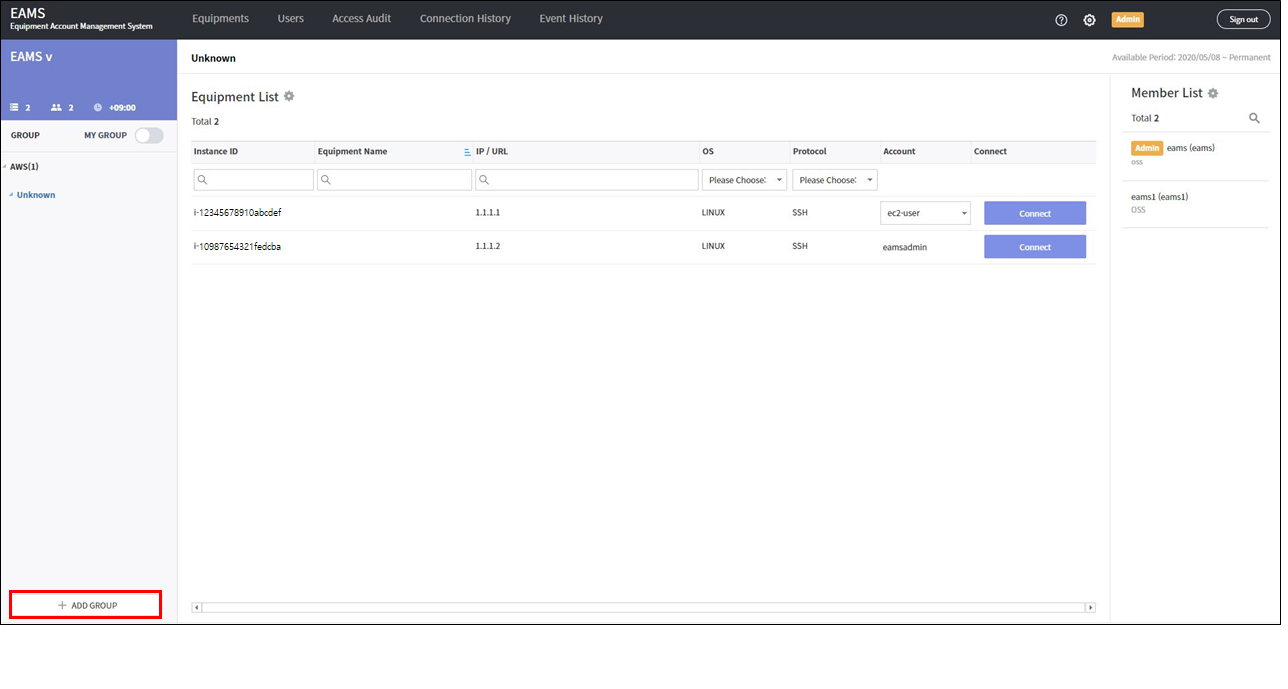
Go to the group tab. Click the + ADD group button at the bottom left of the home screen.
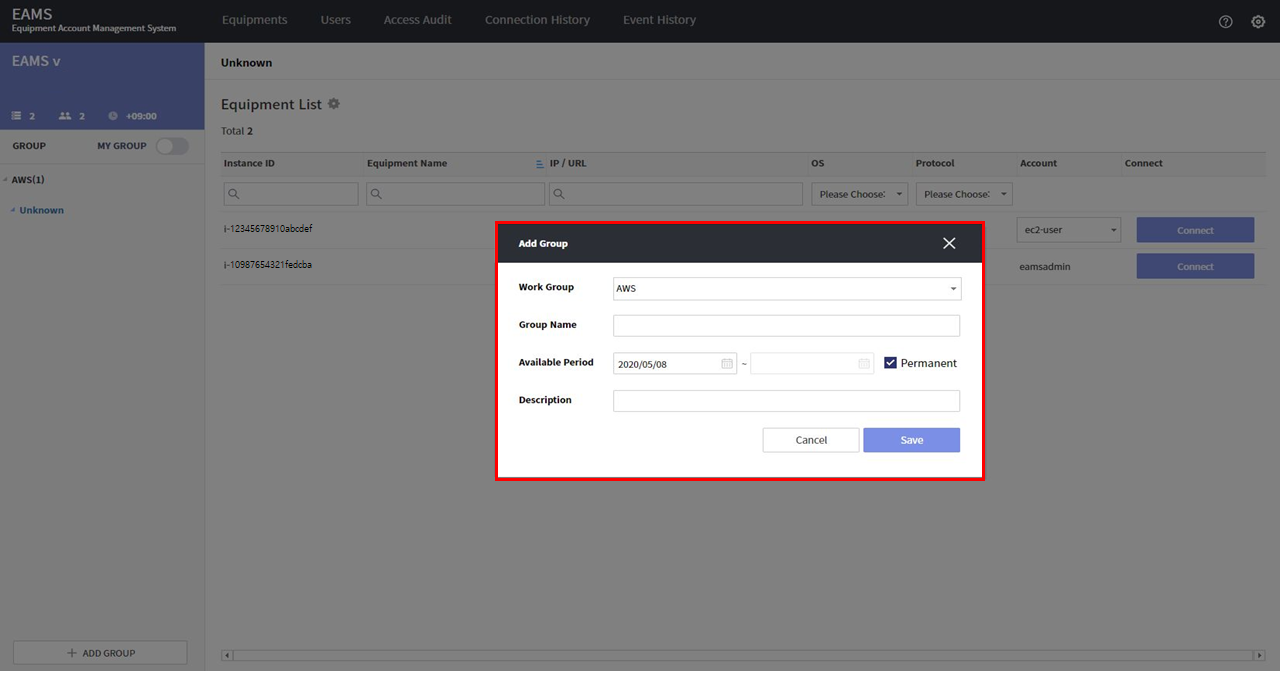
Save the group information.
-
Register equipments in the group
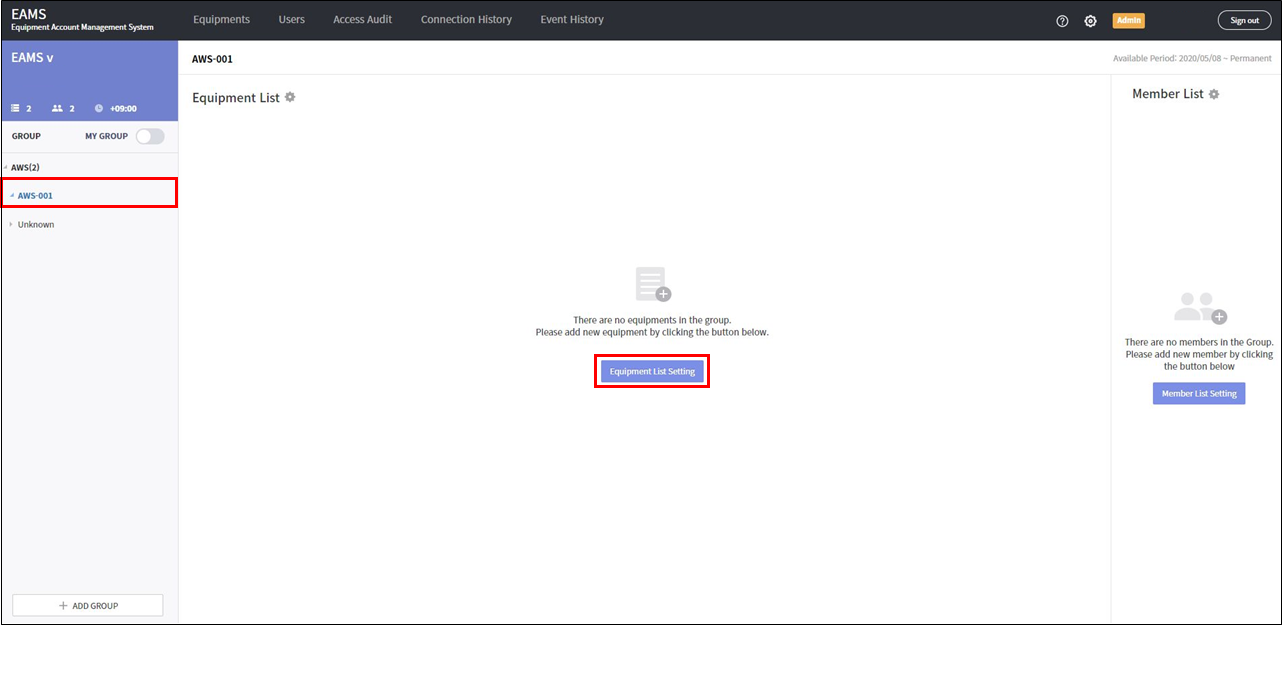
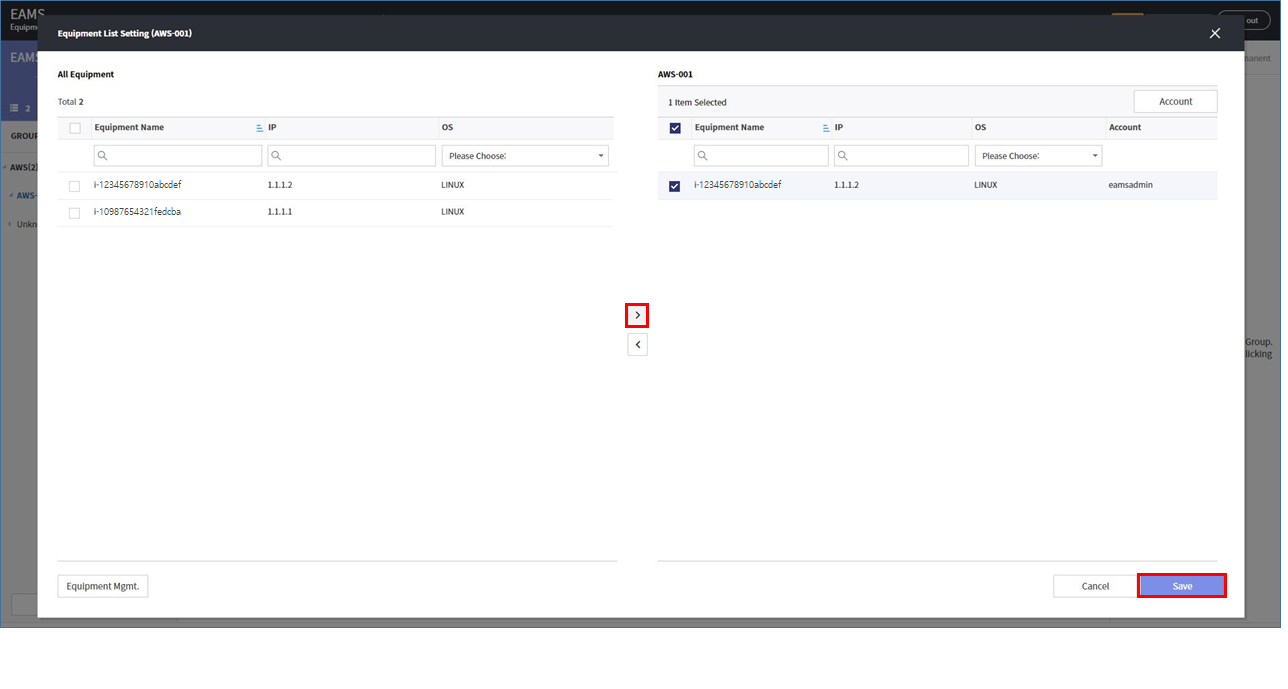
Select a group on the home screen and click the Equipment List Setting button.
Select the equipments to be registered in the group and add it to the group with > button. Click the Save button.
-
Register users in the group
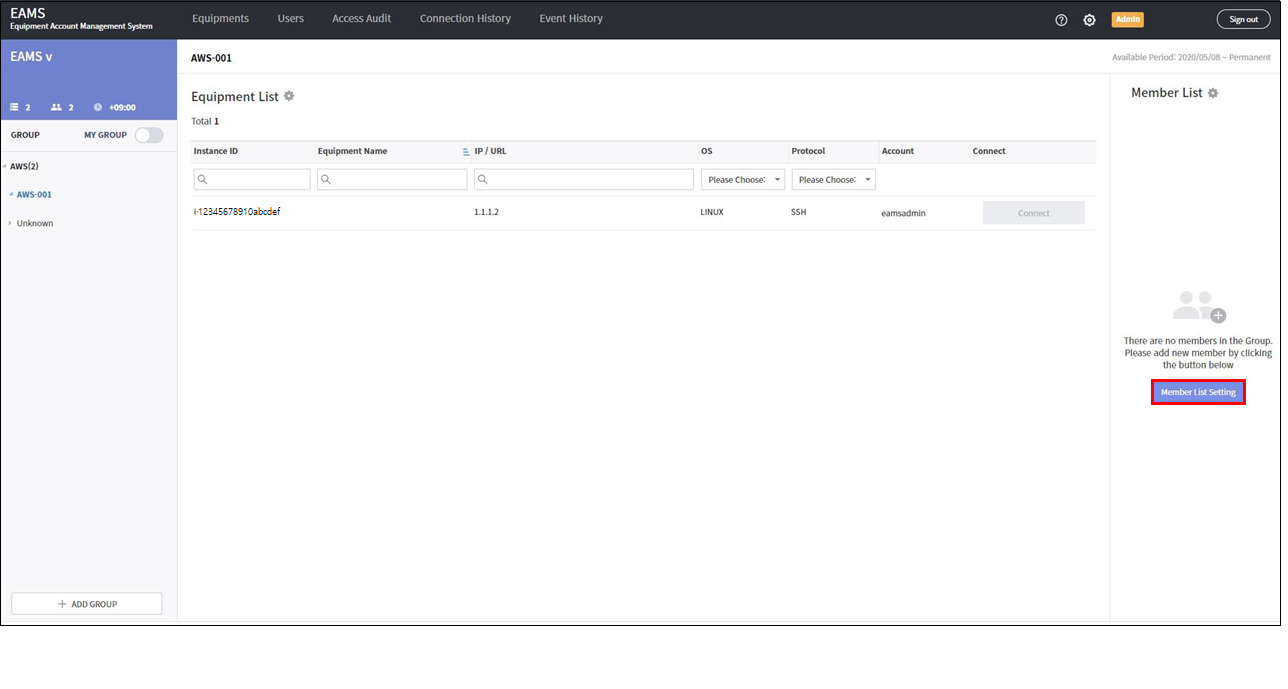
Select a group on the main screen and click the Member List Setting button.
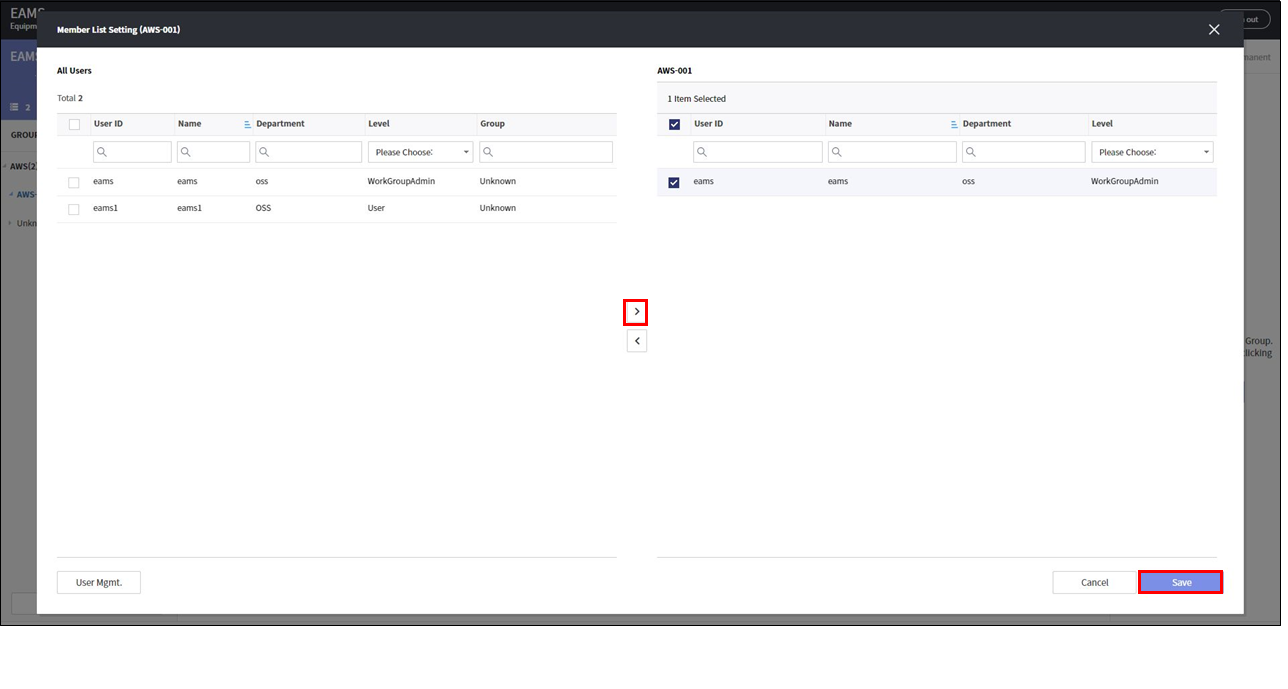
Select a user to be registered in the group and add it to the group with > button. Click the Save button.
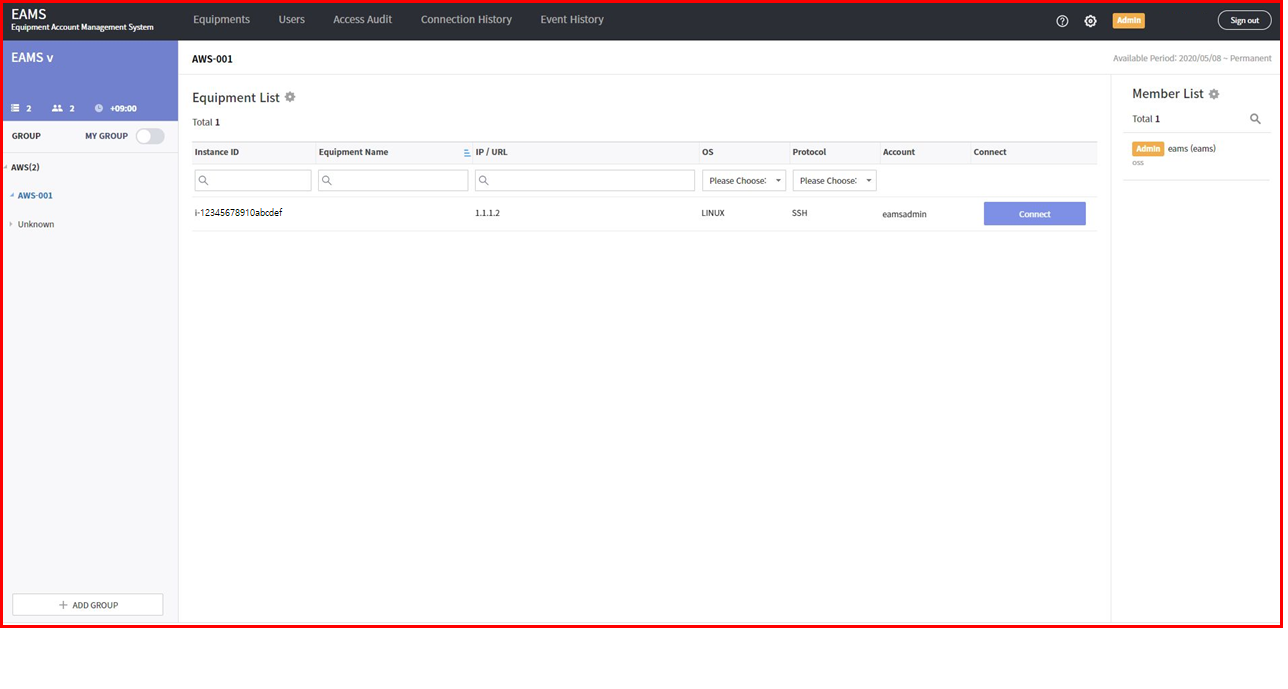
Users assigned to a group can access only equipments assigned to the group.
6. EAMS Management
6.1. User management
There are three levels of EAMS users. The EAMS Tab appears differently for each user level.
- USER
-
You have the authority to access the instance designated by the administrator.
- Workgroup Admin
-
You have the authority to add users, instances, and groups. Create groups and add users and instances to the groups to give users access to the instances. Workgroup Admin has all the privileges that the user has.
- Admin
-
You have the authority to add a Workgroup Admin to each workgroup and configure the EAMS system. Admin has all privileges that Workgroup Admin has.
| USER LEVEL | Tab |
|---|---|
USER |
Instance access screen (Home), record of the user access (Connection History), password inquiry record (Event History) |
WORKGROUP ADMIN |
Instance access screen and group management (Home), instance management (Equipments), user management (Users), Instance access history (Access Audit), password inquiry history (Event History) |
ADMIN |
Instance access screen and group management (Home), instance management (Equipments), user management (Users), Instance access history, system change history, system setting |
You can search, add, modify and delete Users on the User tab.
6.2. Equipment management
You can search, sync, modify, and delete equipments on the Equipment tab.
6.2.1. Sync Equipment
Click the sync button to synchronize the equipments with the instances in the AWS console. Equipment added as a sync is assigned to the default group, "Unknown" group.
6.2.2. Modify Equipment
Select the equipment and modify it with the modify button.

Instance ID |
instance id |
Name |
name of the instance |
IP |
communicable IP with EAMS |
Port |
port to connect |
OS |
instance OS type |
Protocol |
protocol to connect |
Account for Access-ID |
account for connecting to instance |
Account for Access-Password |
account password for connecting to instance |
6.2.4. Access account management
You can access the equipment conveniently by storing the access information in EAMS.
When using the SSM service, You can change the password for your instance account in EAMS. Also, It is possible to automatically change password periodically.
For your instance without SSM service :
Press the account key icon in the equipment list.
-
Add : Add account/password to connect.
-
Delete : Delete the registered account information.
For your instance with SSM service :
Press the account key icon in the equipment list.
-
Account Sync : Synchronize and register the account of the instance.
-
Automatic Password Change : If you check Automatic password change, the password is changed periodically. The password of the instance is changed, and the password is set at random. The password change period can be set by the admin in the system settings.
-
Save Password
-
EAMS : Save only in EAMS and access with the password entered
-
EAMS & Equipment : The account password of the instance is changed with the password you entered and it is stored in EAMS.
-
6.3. Group management
Group is sub-workgroup. You can create multiple Groups under one WorkGroup and assign instances and users to the Groups. Users assigned to the group can access only the instances assigned to the group.
6.3.1. Add Group
You can create a group by filling in group information form with the +ADD GROUP button.
| Input item | Description | Remark |
|---|---|---|
Work Group |
WorkGroup to add Group |
necessary |
Group Name |
Group name |
necessary |
Available Period |
How long to use Group |
|
Description |
Group Description |
option |
6.3.3. Delete Group
Select the delete icon of the group to be deleted and delete it. When deleting a group, the instances and users set in the group are deleted. Instances and user set in WorkGroup are maintained.
6.3.4. Group User Management
Users belonging to a group can access instances registered in the group.
Add users to group :
1. Select the group to which you want to add the user in home screen.
2. Select a user to be registered in the group and add it to the group with > button. Click the Save button.
Delete users from group :
1. Select the group to which you want to delete the user in home screen.
2. Select the user to be delete from the group and delete it to the group with < button. Click the Save button.
6.3.5. Group Equipment Management
By registering the instance added to the WorkGroup to the Group, you can separate the equipment usage policy for each group.
Add equipments to group :
1. Select the group to which you want to add the instance.
2. Select the equipments to be registered in the group and add it to the group with > button.
3. Click the Save button.
Delete equipment from group :
1. Select the group to which you want to delete the equipment in home screen.
2. Select the equipment to be delete from the group and delete it to the group with < button.
3. Click the Save button.
6.3.6. Group Connection Account Settings
You can set the instance account to be used for each group.
-
Click Equipment List setting icon in home screen.
-
Click the Account button in the Equipment List Setting.
-
Click the
Use in groupcheckbox of the account to be used.
You can only access the equipments with the checked account.
6.4. System setting
Click the Settings icon at the top of the EAMS web page to go to the Settings page.
In Setting, you can set account management policy, terminal policy, IP control, etc.
The setting icon is displayed only to EAMS Admin.
6.4.1. EAMS License
You can register a license code that contains information on the number of users, equipment, and expiration date.
After entering the license code in the License Code field and clicking the check button, license information is displayed for a valid license.
6.4.2. Account Management Policy
- Change password automatically
-
You can set the policy and period for automatic password management.
- Displaying the passwords of all equipment accounts
-
You can enable / disable it to check the password of all instances. When a user searches for a password, the action is recorded in the
Event History.
Method |
Password inquiry method. |
Menu |
Choose how you want your instance’s password to appear on the EAMS web page. |
- Unused Account Monitoring
-
You can set whether to activate the batch task to get the recent access log for monitoring unused accounts. Since the script is executed every 4 hours for all registered instances, select enable / disable according to the operating environment. The default setting is enable if there is no indication.
| A script is run to get the lastlog of the Linux instance and the account information for each Windows instance. |
| Unused account monitoring is possible only when the instance users SSM service and certification type is SSM. If the instance certification type is NONE, script execution is not possible, so unused account monitoring is not possible. |
6.4.3. Terminal Settings
You can set the terminal session timeout time, file transfer, and terminal recording settings.
- Terminal Session Timeout
-
If nothing is done within the terminal for the set time Terminal is automatically terminated.
- File transfer
-
This is a file upload / download function through a terminal without using a storage object.
On Windows, when uploading a file, it is saved in the "File storage path" of the EAMS server. The files stored in the EAMS server are automatically deleted through the EAMS internal batch job, but the batch job runs once a day. If a large file is stored and the capacity in the EAMS server is insufficient, the administrator can delete the file directly from "File save path". - Terminal video recording
-
You can configure settings for job history video files stored in EAMS.
-
Recording quality : When it is stored as a high-quality video, it takes up a lot of capacity in the EAMS server, so select and store the low quality (HD) or high quality (Full HD) in consideration of the storage capacity.
-
Video storage path : Path where video files are stored on the EAMS server. If you use a NAS, you need to change the path through EAMS technical support service.
-
Video storage period : The video file is saved for a set period. Set the period considering the storage capacity in the EAMS server.
-
- Storage of movies and files Storage Volume
-
If it is set to 10%, the video is not saved any more if 10% of the capacity of the video storage path remains.
- EAMS Object Storage
-
you can transfer large files through EAMES Object Storage.
-
Storage volume threshold: Set Threshold value to use EAMS Storage. If it is lower than the set value, the EAMS Object Storage function does not work and it operates as a basic file transfer function.
-
6.4.4. IP Access Control
Set to control the IPs accessible to EAMES. Allowed IP can be registered in IP Host, Band, C Class, B Class units. There is no limit to the number of IPs that can be registered.
IPv4: input by IP host unit or band unit. ex) 1.1.1.1, 1.1.1.3-7
C class: input in C class unit. ex) 1.1.1.0
B class: input in B class unit. ex) 1.1.0.0
If IP control is activated without entering any IP information, all IPs will not be connected, so be careful.
6.4.5. Access Log Monitoring
You can set whether to use the access log function that accesses the instance using a path other than EAMS.
- Access Audit
-
-
Unauthorized Access monitoring: The unauthorized access history feature runs the script for all instances in a batch job once a day. Select Enable if you want to use it, or Disable if you do not want to use it.
-
Secondary IP: If the IP accessed from EAMS as an instance accesses to another IP such as a private IP other than the Host IP displayed on the Home screen, it may be treated as an unauthorized access history, not through EAMS. Therefore, additionally, the IP that accesses the instance is registered in the Secondary IP category so that it can be handled as a connection by EAMS.
-
6.4.6. Equipment Validation
- Equipment Validation Check
-
This function verifies whether the instance is in account management or access, and displays the status in a green / red circle on the equipment screen. Every 10 minutes a batch job checks the status of all instances, so you can enable / disable as needed.
| If the equipment status is fail, the interlocking status and equipment connection are continuously checked every 10 minutes, so if you are concerned about the server load, you can disable the function. This feature is only possible if the instance uses the SSM service and the authentication type is SSM. |
